The Illustrated Guide To Salting Passwords

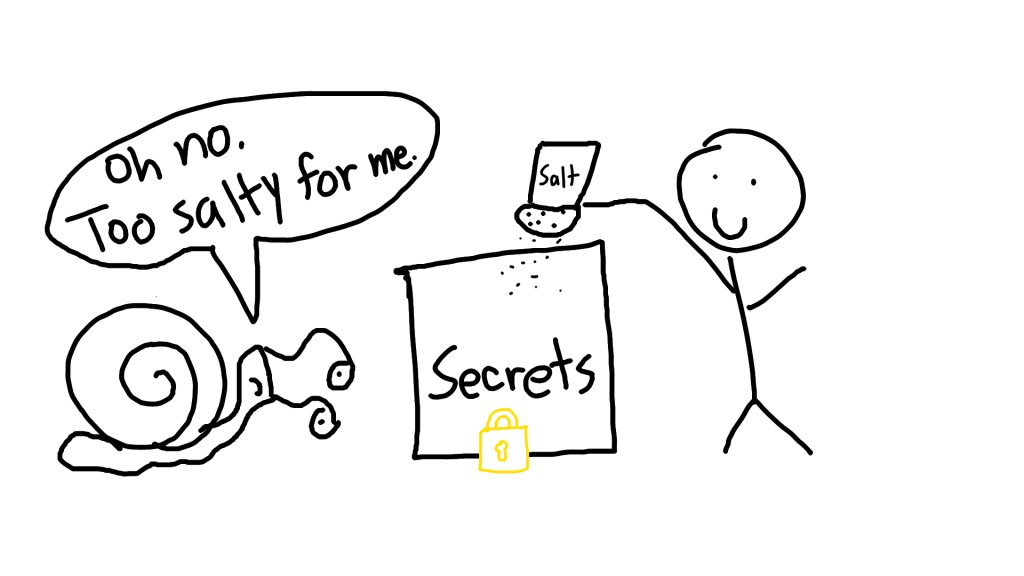
This is Bob, the snail.

Bob just hacked your company’s authentication database, containing your customer’s secrets. Depending on how well you’ve secured those secrets, Bob either becomes a rich and happy snail, or he ends up getting nothing.

So let’s see what happens to Bob, based on how you stored your company’s secrets.

Level 0 – Plain Text

At level 0, it’s amateur hour. Your secrets are all stored in plain-text.

Your team is composed of literal monkeys who accidentally created a piece of software by mashing random buttons until they got a program that compiled.

Because you’ve stored all of the passwords in plain-text, Bob now has instant-access to all of your customer’s information. Not only that, since most people use the same password on several websites, he’s got access to those accounts as well.

Bob now gets to relax on the forest floor, while money showers down on him from all of the accounts he’s hacked.

Level 1 – Hashing

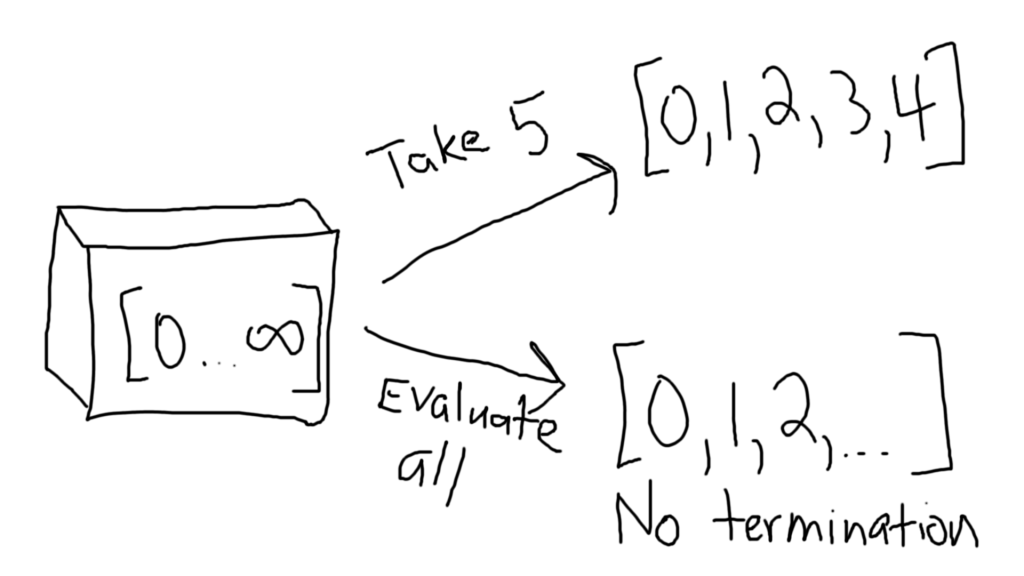
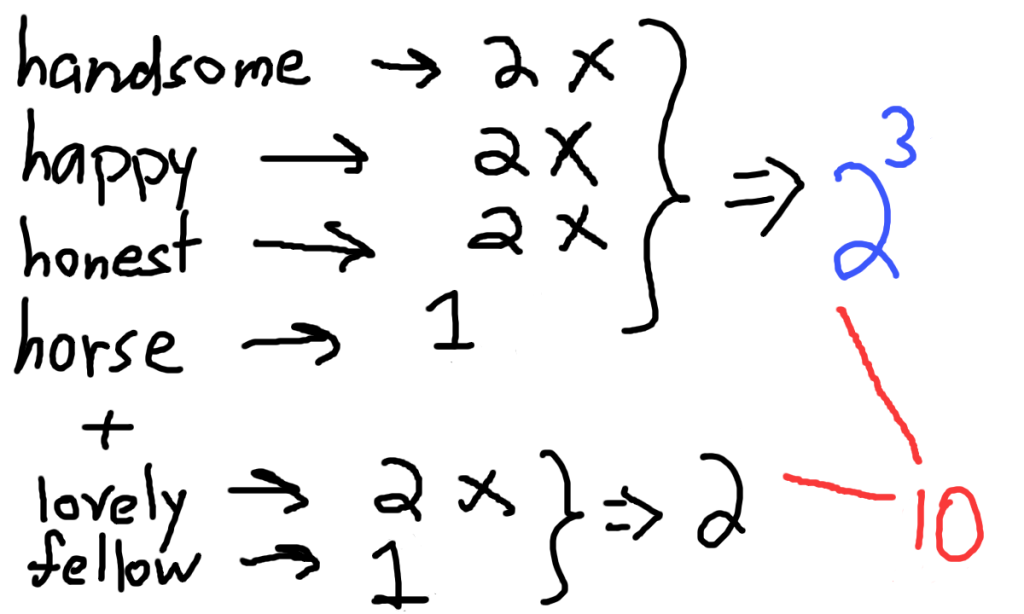
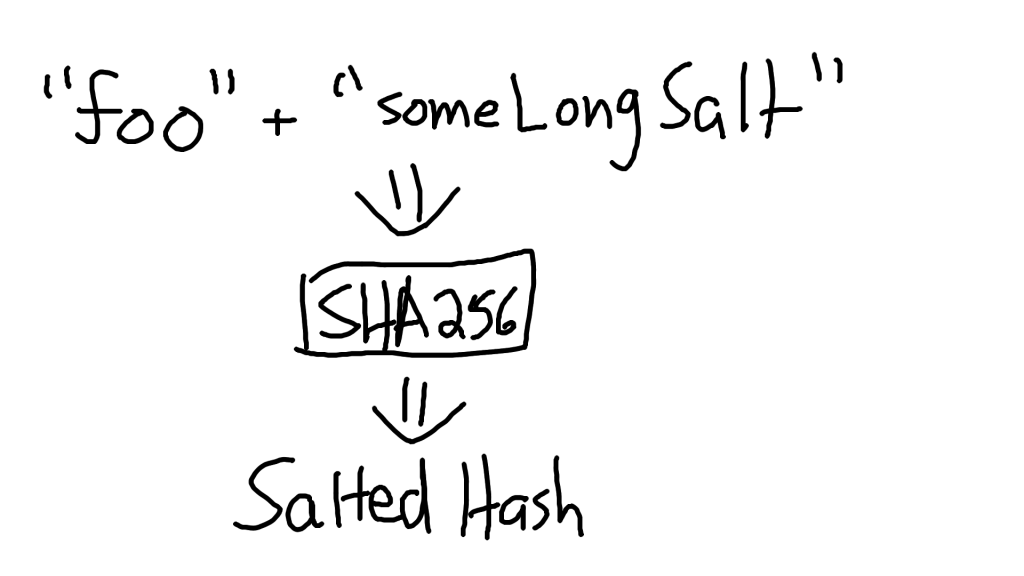
One step up from plain-text is basic hashing with SHA256. When you hash a string, you get another string as output. This output is always the same length, regardless of its input length.

Additionally, the hash function is irreversible, and doesn’t give you any useful indication about the input. In the example below, the SHA256 hash for “foo” and “fooo” are completely different, even though they are only one letter apart.

While hashes can’t be reversed, they can be cracked. All Bob has to do is bring out his trusty tool, the rainbow table.

You see, hashes have a problem, which is that they always produce the same output no matter what.

In other words, when I use SHA256 to hash “foo”, I always get “2c26b46b68ffc68ff99b453c1d30413413422d706483bfa0f98a5e886266e7ae” no matter what.

What Bob has done, is used something called a “rainbow table”, which is a table that contains input keys, and the hashed outputs for those keys (typically as chains of hashes).

Theoretically, if Bob had lots of storage space, Bob could generate all possible passwords up to 8 characters in length, hash every single of those passwords, and store them. Once Bob has assembled his rainbow table, Bob will be able to automatically crack any password hashed with SHA256 in the blink of an eye if it’s 8 characters or less.

Why? Because Bob has already pre-computed all the possible hashes for all 8 (or less) character passwords.

Realistically, Bob is bottlenecked by memory and computation times when it comes to how long his rainbow table can be. Let’s say passwords can contain alphanumerical characters (35 possibilities) and symbols that are located on a normal keyboard, like +, -, ~, \, etc. This gives us an additional 21 possibilities.

In reality, there are way more possible characters, but let’s say that there were 56 in theory as a lower bound. If Bob wants to generate all 5 character possibilities, Bob needs to generate 550,731,776 inputs, and hash all them.

Here’s a chart that shows how absurd the rate of growth is for rainbow tables (assuming 56 possibilities per character):

# characters# of generated inputs
156
3175,616
5550,731,776
896,717,311,574,016
10303,305,489,096,114,176 (303 quadrillion)
169,354,238,358,105,289,311,446,368,256 (9 octillion)

As you can see, rainbow tables really can’t extend very far. Eight characters is still feasible, but after that, it gets inordinately expensive. A 16-character rainbow table would be incredibly difficult to store, and would take an eternity to generate. Note that 56 characters is an incredibly low bound, since there are many other characters that can be used as well. You should expect it to be even more expensive, in practice, to generate a full rainbow table for all 1-8 character passwords.

Level 2 – Salt And Hash

Clearly, the problem with our previous approach was that we were hashing passwords, but these hashed passwords could be cracked by a rainbow table.

So how do we prevent rainbow tables from being used against us?

By using salts! A salt is just a simple string that, in many cases, is just appended to your password before it’s hashed. These salts are generally randomly generated and quite long (16+ characters), which means that our user’s password (8-16 characters) plus the salt (16 characters) should be at least 24 characters long (also note that every password should have a different salt).

This makes our unhashed password at minimum 24 characters, so this password can’t exist in a rainbow table because no one has the capability to generate all possible passwords up to 24 characters long.

We then hash this password, and store both the hashed + salted password, as well as the salt itself, in our database.

But what about our salt? It’s stored in plain-text!

The salt actually has to be stored in plain-text, because the way we verify a salted hash is that we take the user’s inputted password, append the salt, then hash it. If it matches what’s in our database, then it’s the correct password.

So how does all of this effect Bob? Well for starters, it makes the rainbow table incredibly useless. Although Bob has our salt, Bob can’t use his rainbow table against us, unless he re-generates an entirely new one, where each input has the salt appended to it.

For example, suppose our password was “foo”, and the salt was “saltyfish”. Without the salt, Bob would instantly be able to figure out the hash for “foo”. But with the salt, Bob now has to take all of his inputs, append “saltyfish” to them, and only then, will he find that “foosaltyfish” gives a hash match.

Once Bob finds the correct match, he removes the salt (“saltyfish”), leaving him with “foo”. And that’s our password! So Bob can still manage to hack our account.

But that was a really expensive operation. You don’t want to have to re-generate an entire rainbow table, because they’re often petabytes or larger in size. And the whole process of doing that only allowed you to hack one user! If Bob has to go through 300 million users, he would have to regenerate his rainbow table 300 million times, because every password has a different salt!

With your secrets safely salted, Bob has no choice but to find other unwitting victims to hack. Preferably, ones who haven’t salted and hashed their passwords.

The Illustrated Guide To Lazy Evaluation

Most people would tell you that hard work and perseverance are important if you want to be successful, but sometimes it pays to be lazy.

When it comes to programming, however, being lazy has plenty of benefits, and lazy evaluation is just one of those examples. Lazy evaluation is the idea of delaying the evaluation of an expression until the very moment in which you need it.

Lazy evaluation is most commonly used in functional programming languages, and the one of highest notoriety is Haskell, which is a completely lazy language by default (unless you tell it not to be)

How’s Lazy Evaluation Work?

Imagine that you’re a UPS (United Postal Service) employee and your job is to deliver some packages to your customer’s doorsteps.

Unfortunately, you are notoriously also the worst employee in your department.

Unlike a good employee, you don’t respect “Fragile” labels. In fact, you’re not even aware that the package is fragile at all. That’s why in the interest of time, you hurl every package you have, directly onto the hard, unforgiving concrete of your customers’s yards.

Do your packages make it in one piece? Who knows! You never look inside the box. For all we know, the box could be a bunch of stuffed animals, or it could be a very expensive $2,000 laptop that’s as fragile as a piece of glass.

As far as you are concerned, you have a box, and you transport it to someone else. This “box” is the expression, and evaluating the expression would be like opening the box to see its contents. While there is also metadata about the box, like whether it’s fragile or not, you have no clue whether it’s fragile or not until you read the information off the box.

Simply put, the essence of lazy evaluation is that you don’t know what’s inside something until you look at it. Initially, this sounds pretty simple and obvious. If you don’t look inside the box, how can you know what’s in it?

And that’s where it takes a loop. All of these boxes act like the box in Schrödinger’s cat experiment.

When it comes to lazy evaluation, you have no clue what’s in the box, but also there isn’t actually anything tangible in the box either. In a lazy evaluation model, to get a result out of the box, you would need to open it, and the very act of opening it causes the value inside to come into existence. Prior to opening the box, the box is essentially empty (an unevaluated expression, to be precise). It weighs nothing, makes no noise, and otherwise acts exactly like a normal box.

This can give us some pretty neat results. For example, suppose you have an expression like 1 divided by 0. This is the expression, which in our analogy, is the box. In a language like Python or Java, you would immediately crash with a divide by zero error.

But in Haskell, you can have an expression like “div 1 0”, and as long as you don’t evaluate it, nothing happens! You don’t get an error, because until you evaluate “div 1 0”, it simply exists as an expression with no value. Once you evaluate it (open the box, in this case), Haskell finds that the value is erroneous, and an error pops out.

Going a step further, what if you had a list that contained all of the numbers from 0 to infinity? (denoted as [0, infinity])

There is no doubt that this expression is infinite and contains all of the numbers from 0 to infinity. And yet, it doesn’t take up infinite memory, despite having an infinite size.

We can even take the first 5 terms out of this infinite list, and not crash. Why’s that? It’s because when you want to take the first 5 terms out, you evaluate only the first 5 terms in the list. As far as you are concerned, the other terms simply don’t exist, because you didn’t evaluate them into existence.

This means that you can pull finite results out of infinite lists, while also taking finite time and finite space. Note, however, that if you attempt to evaluate the entire list, it will end up taking infinite time, because each value of the list will materialize as each of the subexpressions get evaluated.

Consequently, if you tried to do anything like getting the length of the list, or trying to retrieve the last element in the list, you would not get a terminating result, because both of those require finding a final element, which doesn’t exist in the infinite list, and would require infinite evaluations to occur.

That sounds nifty and cool, but what about real-world applications?

If you’ve ever used a stream in any language (eg; Java streams), then you’ve used lazy evaluation. Streams, by nature, can be optimized by taking advantage of lazy evaluation.

In a real-world environment, streams can have millions to billions of elements. What if you wanted to concatenate two streams that each had at least 1 billion elements? Clearly, you can’t load either of the streams into memory, because that would quickly exceed memory limits.

This means you need to process the streams as abstract expressions, rather than as concrete values. Think of the streams as being two boxes, each containing potentially infinitely many items. With lazy evaluation, concatenating them together is a piece of cake — just put the two boxes inside of a new box.

At no point did you care about the insides of the stream, nor did you ever have to open the streams. This process has constant space and time complexity

With a non-lazy approach, you’d have to pull everything out of the second stream, find the ending element of the first stream, and then append each of the stream’s second elements one by one. Furthermore, you have to assume that no one adds any new elements into stream 1 as you’re appending the items in stream 2, which is a very big assumption to make. The reason the lazy approach doesn’t have this problem, is because you’re literally just stuffing the two streams into a new stream, without needing to know how many elements are in each of the streams, or what the elements are.

Conclusion

So with that, I hope you’ve gotten a better understanding of how lazy evaluation works. It has plenty of real-world use cases, and generally allows you to do operations on two, potentially infinite things, in constant time.

Lazy evaluation also allows you to defer errors until the very last moment, in which you have to evaluate an erroneous expression, at which point everything blows up. But if the erroneous expression is never needed (and thus never evaluated), then the error may as well not exist, which can be quite useful in some project workflows.

As a final note, lazy evaluation has some very notable drawbacks that you will need to be aware of. Firstly, if what you are doing is time-sensitive, like reading the current time, you will to immediately evaluate it on the spot.

This is because the “time” that you have is actually an expression that fetches the current time. The “current time” will actually be the time at which you evaluate it, and not the time at which the expression was created.

If you tried to time how long a program took to run by lazily fetching the start time, running the program, then lazily fetching the end time, you would find that both your start and end time are the same, and so it would output that the program took 0 seconds to run!

Hopefully, you’ve learned a bit about lazy evaluation from this article. There’s plenty more to learn about lazy evaluation, but the gist of it is that you can’t always use lazy evaluation.

As they old adage goes, sometimes, it pays to be lazy.

The Illustrated Guide To Webhooks

Imagine that you’re a software developer for a company that monitors nuclear reactors.

On average, every 1 hour, a warning gets triggered at any individual nuclear reactor. Since these warnings could lead to something catastrophic, they must be monitored in real-time, as every second counts.

Assuming you have one million clients, all of whom need to be notified, what’s an efficient way to do so, while also minimizing server load?

The Naive (And Terrible) Solution

The most straightforward way to solve this problem is to create an API that allows any client to ping your servers to figure out if any warnings have triggered.

At first glance, this looks like a good idea, since writing a RESTful endpoint like this isn’t particularly hard.

However, there’s a problem here. You know that on average, a warning only triggers every 1 hour.

You also know that the client is heavily concerned about these warnings, and since the client needs the warnings in “real-time”, let’s just conservatively assume that the client checks every 1 second for a warning.

Average number of warnings per hourNumber of times a client checked per hourAverage number of checks with no results (no warning found)
136003559
6036003540
120036002400
360036000

In the table above, you can see that there’s clearly a problem here. Regardless of the number of average warnings per hour, the client is still checking 3600 times an hour. In other words, as the average number of warnings goes down, the number of pointless checks goes up.

At 1 warning per hour, across 1 million clients, you would have over 3.5 billion unnecessary checks per hour. Even if we disregard how horribly inefficient this is, the real question is whether your servers can even comfortably handle that load without crashing.

Clearly, we can’t allow the client to grab the data on their own every 1 second, because this would cause a horrifically large amount of traffic (over 3.5 billion requests). Remember, at an average of 1 warning per hour, across 1 million clients, we should only have to send, on average, 1 million responses.

Sounds like a tough problem, but that’s where webhooks come in!

Introducing: Webhooks!

Webhooks are like reverse APIs. They’re like interviewers saying “Don’t call us, we’ll call you”.

Instead of having your clients ping your API every 1 second, you simply ping the client whenever a trigger occurs. Since you are only notifying the client whenever a warning occurs, it means that the client only gets notified when a warning exists. Therefore, there is no unnecessary traffic. You send out exactly 1 million responses, one per warning, and it’s still done in real-time.

But how does the client “receive” the request?

Remember how I said a webhook is like a reverse API? The client is the one who writes the RESTful endpoint. All we have to do is record the URL to the endpoint, and each time the warning triggers, we send an HTTP request to the client (not expecting a response, of course).

What the client does with your POST’d request doesn’t matter. The client, in fact, can do anything they want, as long as their endpoint is registered with you.

This process can be generically applied to an infinite number of clients, by linking each client to the endpoint that they provided.

To summarize,

  1. Clients need to create a RESTful endpoint.
  2. Client gives you the URL to the endpoint.
  3. You save the endpoint somewhere.
  4. Anytime a warning triggers for that particular client, you send a POST request, with the warning enclosed, to the endpoint that they gave you.
  5. Client receives the POST request automatically, in real-time, and handles the warning in whatever fashion they want.

Conclusion

A webhook is an incredibly useful and simple tool that allows you to send data to clients in real-time based on some event trigger. Since the data is sent immediately after the event trigger, webhooks are one of many effective solutions for real-time event notification.

Additionally, since webhooks work in a “don’t call us, we’ll call you” fashion, you will never have to send a request unless an event trigger happens, which results in much lower server traffic.

In the example given above, at 1 warning per hour, across 1 million clients, using webhooks reduces the number of API calls from over 3.5 billion per hour to exactly 1 million per hour.

So the next time you have a situation where you need to notify clients based on some sort of event trigger, just remember this simple motto — “Don’t call us, we’ll call you”.

The Illustrated Guide to Semaphores

You are the receptionist at a very fancy Michelin-star restaurant. Due to COVID-19 restrictions, you can only allow 10 people in at a time, and if there are ever more than 10 people in the restaurant at the same time, the restaurant loses its license and shuts down.

How do you enforce this? One way you can do it is by using semaphores. To the receptionist, a semaphore is like a counter.

Initially, the semaphore starts at 10, representing that there are 10 empty spots in the restaurant. When someone enters the restaurant, they are “acquiring” the semaphore. Each time someone acquires the semaphore, they get to enter the restaurant, and the semaphore decrements by one.

As soon as the semaphore hits 0, that means that the restaurant is full, and so we can’t allow any more people in. At this point, anyone who tries to enter the restaurant by acquiring the semaphore will block. Remember that each person can act independently (ie; they’re separate threads), so this means that as long as the semaphore is 0, everyone who tries to acquire it, even if they cut in line, will inevitably have to wait.

So what happens when someone leaves the restaurant when the semaphore is at 0? When someone leaves, they “release” the semaphore. Ordinarily, this will increase the semaphore by 1, but if someone is blocked on the semaphore, like the two customers above, one of the two customers will get unblocked by the release, allowing one (and only one) of them to get in. When this happens, the semaphore remains at 0 since there are still only 10 people in the restaurant (one left, one entered, so there is no change).

Now here comes the interesting part. There are two types of semaphores. The first type is a “fair” semaphore. A fair semaphore acts like a normal line. If the semaphore is 0, the first person who finishes the acquire call and gets blocked, is also the first person to get unblocked when a customer leaves and releases the semaphore. Thus, it acts like a standard queue.

A tiny caveat is that it’s the first person who finishes the acquire call, not the first person who makes the acquire call. If Bob calls acquire first, then John, but John’s acquire call resolves before Bob’s, then John will be the first to get unblocked.

The other type of semaphore is an unfair semaphore. An unfair semaphore is different in that it doesn’t guarantee that the first person who blocks is also the first person to unblock. With an unfair semaphore, as soon as one person (thread) exits, it’s like a mad crowd of people all trying to get in at once, with no sense of order or fairness in sight.

Because of this, it’s not exactly a good idea to use unfair semaphores if you’re waiting in line at a restaurant. Suppose there was a man in line, and he failed to get into the restaurant after someone left. What would happen if he was super unlucky, and failed to get in even after a really long time?

This situation is called starvation, and it occurs when a thread (person) is continuously unable to do some sort of work due to being blocked or forced to wait. In this case, a customer is unluckily unable to enter the restaurant, because they never get chosen to get unblocked by the semaphore.

In the example image above, the semaphore counter is currently 0. Bob is the one wearing the blue hat, and he is blocked.

A new person arrives in step one and blocks on the semaphore. Then in step 2, someone leaves, and releases the semaphore. In step 3, the newly arrived person gets unblocked by the semaphore, allowing them to enter.

This leaves poor Bob in step 4 to starve. Then, it loops back to step 1, and the whole process repeats over and over again, guaranteeing that Bob never gets into the restaurant. In this scenario, Bob starves, both literally and in the programming sense.

Now, this is a very particular scenario, and it’s highly unlikely that Bob will continuously get blocked over and over again for an infinite amount of time. Depending on how unlucky Bob is, and how many people Bob is competing with, Bob could be stuck waiting for months or even years.

Conclusion

So based off these results, you’re probably thinking something like, “Oh, that sounds awful. Guess I’ll just use fair semaphores instead of unfair semaphores.”

Unfortunately, it’s not always best to choose fair semaphores. If fair semaphores were faster than unfair semaphores, and had better utility, then no one would ever use unfair semaphores.

When using a fair semaphore, you have additional overhead because you need to remember the exact ordering of who called acquire first, which makes them slower than unfair semaphores who will just randomly pick the first free thread that it sees.

The main reason to use a semaphore is when your problem has a limited resource, typically some sort of resource pool, that needs to be shared with other threads. You want the semaphore to be the size of the number of resources so that it blocks when all of the resources are gone, and unblocks when some thread releases their piece of the resource pool.

Lastly, remember that a binary semaphore (a semaphore whose value initializes at 1) is not the same as a mutex lock, and you generally shouldn’t use a binary semaphore in place of a mutex. Mutex locks can only be unlocked by the thread that locked it, whereas semaphores can be released by any thread, since it has no sense of ownership.

For most intents and purposes, a binary semaphore can basically act as a lock. However, you really shouldn’t say that a mutex lock is just a binary semaphore, because saying that is like saying that a car is an umbrella. It’s technically true, since a car covers you from the rain, but any normal person would look at you as if you had two heads.

How To Become An Elite Performer By Using Multi-Tenant Architecture

Multi-tenant architecture, also known as multi-tenancy, is the idea of having your users (also known as tenants) share a pool of resources on a single piece of hardware.

To understand multi-tenancy, imagine you had a single computer, running a single program. Multi-tenancy is like having multiple applications run on one computer, while single-tenancy is like buying a new computer each time you had to open a new application.

Let’s suppose opening a YouTube video on Google Chrome counted as one program (and that you couldn’t open a new tab on Google Chrome). This would be the result:

However, unlike new Google Chrome instances, every tenant’s data is logically separated, such that no tenant has access to another tenant’s data, unless they have permission to do so.

The two main reasons to use single-tenancy architectures is

  1. They’re really really easy to setup. For the most part, you usually just have to give each tenant their own private database. Also, if your tenant needs a specific kind of environment that no other tenant uses, this is also easy to do, because each tenant can have their own private environment. Suppose one tenant wants to use PostgreSQL, another one wants to use MySQL, and third wants to use OracleDB. Assuming you have an interface to handle different types of databases, that would be no problem at all, because each tenant has their own database.
  2. It’s “more secure” than multi-tenancy architectures. Proponents of single-tenancy architectures will say that since you’re sharing resources on a single piece of hardware, you might have huge security vulnerabilities. This is because your tenants are typically separated by virtual machines/containers, with these VMs/containers being on the same computer. It stands to reason then, that if someone finds a vulnerability in the hypervisor that you’re using, then they can escape the VM/container (also known as a hypervisor attack) and theoretically access every tenant’s data on that machine.

Note that point 2, while a potential concern, is not really much of a concern. There are very few organizations that care more about security than the NSA (National Security Agency), and even the NSA reports these kinds of shared-tenancy vulnerabilities are incredibly rare, and that there “have been no reported isolation compromises in any major cloud platform”. Should you be afraid of hypervisor attacks over the massive cost savings of a multi-tenancy architecture? Probably not.

Now that you understand the basics of multi-tenancy architectures, let’s talk about why elite performers use multi-tenancy architectures.

Elite Performers Are Lightning Fast

The five essential characteristics of cloud computing, according to Accelerate’s State of DevOps 2019 Report, are:

  1. On-demand self-service (allow the consumer to provision resources)
  2. Broad network access (works on most platforms)
  3. Resource pooling (multi-tenancy)
  4. Rapid elasticity (rapid scaling)
  5. Measured service (can control optimize, and report usages)

Of these five characteristics, resource pooling, rapid elasticity, and measured services are all directly related to, or made easier with multi-tenancy. In other words, just by using a multi-tenancy architecture, you should already have three of these five things checked off, assuming you are following generally good practices. On-demand self-service and broad network access can be equally easily done with either single-tenancy or multi-tenancy architectures.

It should come to no surprise, then, that “elite performers were 24 times more likely to have met all essential cloud characteristics than low performers”. So clearly, the elite performers are using multi-tenancy architectures, but what’s the material gain?

Image courtesy of Accelerate’s State of DevOps 2019

More deployments, faster deployments, faster recoveries, and fewer failures. And not just by small margins either, recovering from incidents 2604 times faster is like the difference between recovering from an issue in a week, and recovering in just under 4 minutes.

Elite Performers Are Worth Their Weight in Gold

So how much exactly are elite performers saving with multi-tenancy architectures? According to Accenture, their work with police departments in the UK to switch over to multi-tenancy architectures will save a projected estimate of $169 million pounds (~$220 million USD). And on top of that, by making this switch, they claim that “time and workload gains in incident reporting can be upwards of 60%”. While switching to a multi-tenancy architecture is not easy, those are huge savings, brought mostly in part due to centralized data.

In multi-tenancy architectures, every tenant shares the same database, which makes sharing data much easier. According to Accenture, the average state in the U.S. has “300 different record systems”. That means that in the U.S.’s law enforcement agencies, there should be a minimum of 15,000 different databases.

Imagine you had to fetch data from 15,000 different databases. You don’t have access to any of them, and they’re all potentially in different formats with no national standardization. How do you coordinate such a massive task? Sure, you could email every single enforcement agency and have them manually share their data with you, but that would take on the scale of months to years.

Now imagine that all law enforcement agencies shared one database, with a handful of different standardized schemas. If you wanted to access a list of known offenders in Texas and Ohio, and merge them with some other table, you can do so without having to first convert everything into a standardized format, because they’re guaranteed to be in the same format. This makes everything incredibly easy to handle, and best of all, you can access them on-demand because the data is centralized, so you can get them instantly if you have admin-level authorization.

Elite performers who use multi-tenancy architectures save money, and accelerate data sharing. With savings like these, elite performers are absolutely worth their weight in gold.

Conclusion

Elite performers use multi-tenancy architectures, and while it’s true that using a multi-tenancy architecture won’t automatically turn you into an elite performer overnight, it will certainly set you on the right path.

Following good cloud computing practices is essential to speeding up development times and reducing costs. If you are interested in learning more, I strongly advise you to read Accelerate’s State of DevOps 2019, which is sponsored by Google, Deloitte, Pivotal, and other great tech companies.

One of the best ways to improve at your craft is to just copy the best. Is it original and creative? Not at all. But is it effective? Absolutely.

The Theater Student’s Guide To Passing Coding Interviews

You’re not quite sure how you ended up in this situation.

You, a theater major and Shakespeare enthusiast, are currently stuck in a whiteboard programming interview.

What’s the catch? You have no programming experience, and you’ve never attended a programming class in your life.

The interviewer rattles off his first question.

“Let’s start with Fizzbuzz. Write a program that prints the numbers from 1 to 100. If it’s a multiple of 3, print ‘Fizz’. If it’s a multiple of 5, print ‘Buzz’. If it’s a multiple of both 3 and 5, print ‘FizzBuzz'”.

You furiously furrow your brows, frantically thinking of a way to pass this coding test. You look at the position’s job description, but you don’t recognize any of the programming languages in the description.

“What programming languages am I allowed to use?”, you ask.

“Oh, feel free to use any language you want.”

Suddenly, your eyes light up.

Any language you say?”

Like any good theater student, you are well-versed in Shakespearean language, and so you confidently walk up to the whiteboard to begin drafting your solution.

“I’ll be using the Shakespeare Programming Language. First, we’ll need a dramatic title for our play. Let’s call it ‘The Elucidation of Foul Multiples'”.

And like a play, no program is complete without its supporting actors. Let’s add in our cast of actors from Romeo and Juliet, with an added bonus of Prince Henry, because why not.


The Elucidation of Foul Multiples.

Romeo, the hopeless romantic.
Mercutio, the grave man.
Prince Henry, the noble.
Ophelia, the drowned.

And just like how a computer program has code and functions, a play has acts and scenes.

Let’s introduce our first scene and act, so we can start cracking at this Fizzbuzz problem.


                    Act I: The Revelation Of Wretched Multiples.

                    Scene I: Romeo The Sweet Talker.

[Enter Prince Henry and Romeo]

Romeo: 
  You are as rich as the sum of a handsome happy honest horse and a lovely fellow. 
  Thou art the square of thyself.

[Exit Prince Henry]

[Enter Ophelia]

Romeo: 
  You are the sum of a beautiful blossoming daughter and the moon.
[Exit Ophelia]

[Enter Mercutio]

Romeo: 
  You plum.

To start off our beautiful play, we need to setup the drama. To do this, we have Romeo run around complimenting people with alliterations.

I’m not sure I follow. How does writing out this play help you calculate Fizzbuzz?“, the interviewer asks.

Well you see, at any given time, there can only be two people on stage. Whoever is on the stage with Romeo will be affected by Romeo’s compliments.

When Romeo compliments an actor, each of Romeo’s nouns will count for “1”, and each adjective counts as a multiplier of 2, forming powers of 2.

So when Romeo tells Prince Henry through that he’s as rich as the “sum of a handsome happy honest horse and a lovely fellow”, the first part evaluates to 8 (3 adjectives, 1 noun = 2^3) and the second part just evaluates to 2 (1 adjective, 1 noun). This sets Prince Henry to 10.

Then, we say that Prince Henry is the “square of thyself”, where “thyself” is a reflexive noun referring to Prince Henry himself. This means Prince Henry will square his own value, setting him to 10^2 = 100.

We can then use Prince Henry as a comparator to check when our FizzBuzz program reaches 100.

We do the same with Ophelia to set her to 5, but only because obtaining multiples of 5 is inconvenient when everything is in powers of 2, so she’s more of a supporting actor in this play.

Lastly, Mercutio is the counter that goes from 1 to 100, so by calling him a “plum”, he will be initialized to 1, since all nouns are equal to 1.

And now, for the climax of the drama!


		   Scene II: A Pox Upon Both Houses.
Mercutio:
  Is the remainder of the quotient between myself and the difference between Ophelia and a warm wind as good as nothing?

Romeo:
  If so, let us proceed to scene V.

		   Scene III: What's In A Name.
Mercutio:
  Is the remainder of the quotient between myself and Ophelia as good as nothing?

Romeo:
  If so, let us proceed to scene VI.

		   Scene IV: You Shall Find Me A Grave Man.
Romeo:
  Open your heart!

Mercutio:
  Let us proceed to scene VII.

Here, we do our checks for whether Mercutio is a multiple of 3, 5, or neither. If he’s a multiple of 3 or 5, we will move over to scenes V and onwards, but if neither of those conditions are true, Romeo will compel Mercutio to open his heart. “Open your heart” is a code keyword in the Shakespeare language for “print your stored numerical value”.

And now for the play’s resolution!


		   Scene V: I Do Not Bite My Thumb At You.
Mercutio:
  Thou art the sum of a warm lamp and Ophelia.
  You are the product of thyself and the product of Ophelia and a brave squirrel.
  Speak your mind!

  You are the sum of yourself and the sum of a rich father and a mother. Speak your mind!

  Thou art the sum of the sum of the square of a cute cunning squirrel and a plum and thyself. 
  Speak your mind! Speak your mind!

  Is the remainder of the quotient between myself and Ophelia as good as nothing?

Romeo:
  If not, let us proceed to scene VII.

		   Scene VI: Wherefore Art Thou Romeo.
Mercutio:
  Thou art the sum of a fair fine angel and a gentle lovely flower. 
  You are the sum of a fair daughter and the square of thyself! Speak your mind!

  You are as charming as the sum of yourself and the square of a beautiful lovely lamp.
  Thou art the sum of thyself and the sum of a rich purse and a plum. Speak your mind!

  Thou art the sum of thyself and Ophelia. Speak your mind! Speak your mind!

		   Scene VII: Good Night, Good Night, Parting Is Such Sweet Sorrow.
Romeo: 
  You are as noble as the sum of yourself and a Lord. 

Mercutio:
  You are the product of Ophelia and a warm wind. Speak your mind!

Mercutio:
  Am I better than Prince Henry?

Romeo:
  If not, let us return to Scene II.
[Exeunt]

In order for us to print an ASCII character, we need one of the actors to set their value to the ASCII code for that character. Then, we trigger the printing of that ASCII character by having an actor say “Speak your mind!”.

In scenes V and VI, Mercutio and Romeo are in the scene, and Mercutio is setting Romeo’s values to the ASCII codes “70”, “73”, “90”, “90” for “FIZZ”, and “66”, “85”, “90”, “90” for “BUZZ” in scenes V and VI respectively.

In Scene V, which is when “FIZZ” is printed, there’s a possibility that the number isn’t also a multiple of 5, in which case we skip the “BUZZ” case via the “If (not/so), let us proceed to scene X” statement. This forces all of the actors on stage to switch to a different scene, without exiting or entering any new actors (ie; it’s a GOTO statement).

Lastly, by the time we get to scene VII, we increment Mercutio by one (by adding him to a noun, which counts for 1). If Mercutio’s value isn’t greater (better) than Prince Henry’s (100), then we loop back to Scene II, where we go through the process all over again until Mercutio’s value is over 100.

And of course, we will need new lines/line feeds for each new iteration, so we set Romeo to the product of Ophelia (5) and a warm wind (2) in order to get him to print out a new line character (ASCII code #10).

Impressed by the brilliance of your own play, you finally add the finishing [Exeunt] to your Shakespeare program to tell all of the actors to get off the stage, and just in time too — since the whiteboard’s run out of space.

The interviewer looks at you with a bewildered expression, no doubt impressed by your incredible Shakespearean prowess.

“So, did I get the job?”

Author’s note: If you want the source code, you can find it available here.

Learn OpenAPI in 15 Minutes

An OpenAPI specification (OAS) is essentially a JSON file that contains information about your RESTful API. This can be incredibly useful for documenting and testing your APIs. Once you create your OAS, you can use Swagger UI to turn your OAS into a living and interactive piece of documentation that other programmers can use.

Typically, there are libraries that can analyze all of your routes and automtaically generate an OAS for you, or at least a majority of it for you. Sometimes, it’s not feasible to generate it automatically, or you might want to understand why your OAS is not generating the correct interface.

So in this tutorial, we’ll learn OpenAPI in 15 minutes, starting right now.


First, here is the Swagger UI generated by the OAS we will be examining.

This is what an example “products” GET route with query parameters will look in Swagger UI when expanded:

And lastly, here is what a parameterized route will look like:

The routes can be tested inside of Swagger UI, and you can see that they are documented and simple to use. A Swagger UI page can easily be automatically generated if you have the OpenAPI spec (OAS) completed, so the OAS is really the most important part. Below are all of the major pieces of an OAS.


{
  # Set your OpenAPI version, which has to be at least 3.0.0
  "openapi": "3.0.0",
  # Set meta-info for OAS
  "info": {
    "version": "1.0.0",
    "title": "Henry's Product Store",
    "license": {
      "name": "MIT"
    }
  },
  # Set the base URL for your API server
  "servers": [
    {
      # Paths will be appended to this URL
      "url": "http://henrysproductstore/v1"
    }
  ],
  # Add your API paths, which extend from your base path
  "paths": {
     # This path is http://henryproductstore/v1/products"
    "/products": {
      # Specify one of get, post, or put
      "get": {
        # Add summary for documentation of this path 
        "summary": "Get all products",
        # operationId is used for code generators to attach a method name to a route
        # So operation IDs are optional, and can be used to generate client code
        "operationId": "listProducts",
        # Tags are for categorizing routes together
        "tags": [
          "products"
        ],
        # This is how you specify query parameters for your route
        "parameters": [
          {
            "name": "count",
            "in": "query",
            "description": "Number of products you want to return",
            "required": false,
            # Schemas are like data types
            # You can define custom schemas, which we will see later
            "schema": {
              "type": "integer",
              "format": "int32"
            }
          }
        ],
        # Document all possible responses to your routes
        "responses": {
          "200": {
            "description": "An array of products",
            "content": {
              "application/json": {
                "schema": {
                  # This "Products" schema is a custom type 
                  # We will look at the schema definitions near the bottom
                  "$ref": "#/components/schemas/Products"
                }
              }
            }
          }
        }
      },
      # This is a POST route on /products
      # If a route has two or more of a POST/PUT/GET, specify it as one route
      # with multiple HTTP methods, rather than as multiple discrete routes
      "post": {
        "summary": "Create a product",
        "operationId": "createProduct",
        "tags": [
          "products"
        ],
        "responses": {
          "201": {
            "description": "Product created successfully"
          }
        }
      }
    },
    # This is how you create a parameterized route
    "/products/{productId}": {
      "get": {
        "summary": "Info for a specific product",
        "operationId": "getProductById",
        "tags": [
          "products"
        ],
         # Parameterized route section is added here
        "parameters": [
          {
            "name": "productId",
            # For query parameters, this is set to "query" 
            # But for parameterized routes, this is set to "path"
            "in": "path",
            "required": true,
            "description": "The id of the product to retrieve",
            "schema": {
              "type": "string"
            }
          }
        ],
        "responses": {
          "200": {
            "description": "Successfully added product",
            "content": {
              "application/json": {
                "schema": {
                  # Custom schema called "Product"
                  # We will next examine schema definitions
                  "$ref": "#/components/schemas/Product"
                }
              }
            }
          }
        }
      }
    }
  },
  # Custom schema definitions are added here
  # Note that ints, floats, strings, and booleans are built-in
  # so you don't need to add custom schemas for those
  "components": {
    "schemas": {
      # define your schema name
      # custom schemas are referenced by "#/components/schemas/SCHEMA_NAME_HERE"
      "Product": {
        "type": "object",
        # define which of the properties below are required
        "required": [
          "id",
          "name"
        ],
        # define all of your custom schema's properties
        "properties": {
          "id": {
            "type": "integer",
            "format": "int64"
          },
          "name": {
            "type": "string"
          }
        }
      },
      # Sometimes you will want to return an array of a custom schema
      # In this case, this will return an array of Product items
      "Products": {
        "type": "array",
        "items": {
          "$ref": "#/components/schemas/Product"
        }
      }
    }
  }
}

If you want to try out the OAS above, here is a version of it with no comments that can be passed into Swagger UI or any Swagger editor, like https://editor.swagger.io/.


{
  "openapi": "3.0.0",
  "info": {
    "version": "1.0.0",
    "title": "Henry's Product Store",
    "license": {
      "name": "MIT"
    }
  },
  "servers": [
    {
      "url": "http://henrysproductstore/v1"
    }
  ],
  "paths": {
    "/products": {
      "get": {
        "summary": "Get all products",
        "operationId": "listProducts",
        "tags": [
          "products"
        ],
        "parameters": [
          {
            "name": "count",
            "in": "query",
            "description": "Number of products you want to return",
            "required": false,
            "schema": {
              "type": "integer",
              "format": "int32"
            }
          }
        ],
        "responses": {
          "200": {
            "description": "An array of products",
            "content": {
              "application/json": {
                "schema": {
                  "$ref": "#/components/schemas/Products"
                }
              }
            }
          }
        }
      },
      "post": {
        "summary": "Create a product",
        "operationId": "createProduct",
        "tags": [
          "products"
        ],
        "responses": {
          "201": {
            "description": "Product created successfully"
          }
        }
      }
    },
    "/products/{productId}": {
      "get": {
        "summary": "Info for a specific product",
        "operationId": "getProductById",
        "tags": [
          "products"
        ],
        "parameters": [
          {
            "name": "productId",
            "in": "path",
            "required": true,
            "description": "The id of the product to retrieve",
            "schema": {
              "type": "string"
            }
          }
        ],
        "responses": {
          "200": {
            "description": "Successfully added product",
            "content": {
              "application/json": {
                "schema": {
                  "$ref": "#/components/schemas/Product"
                }
              }
            }
          }
        }
      }
    }
  },
  "components": {
    "schemas": {
      "Product": {
        "type": "object",
        "required": [
          "id",
          "name"
        ],
        "properties": {
          "id": {
            "type": "integer",
            "format": "int64"
          },
          "name": {
            "type": "string"
          }
        }
      },
      "Products": {
        "type": "array",
        "items": {
          "$ref": "#/components/schemas/Product"
        }
      }
    }
  }
}

How To Reduce Vision and Image Processing Times

Have you ever tried writing a program to analyze or process images? If so, you’re likely no stranger to the fact that analyzing large numbers of images can take forever. Whether you’re trying to perform real-time vision processing, machine learning with images, or an IoT image processing solution, you’ll often need to find ways to reduce the processing times if you’re handling large data sets.

All of the techniques listed in this article take advantage of the fact that images more often than not have more data than needed. For example, suppose you get a data set full of 4K resolution full-color images of planes. We’ll use this image below to track our optimization steps.

Removing Colors

There are many situations in which color is necessary. For example, if you’re trying to detect fresh bloodstains in an image, you normally wouldn’t turn an image into grayscale. This is because all fresh bloodstains are red, and so you would be throwing away critical information if you were to remove the color from an image.

However, if color is not necessary, it should be the first thing that you remove from an image to decrease processing times.

The reason removing color from an image decreases processing time is because there are fewer features to process, where we’ll say a feature is some measurable property.

With RGB (red, green, blue, ie; colored images), you have three separate features to measure, whereas with grayscale, you only have one. Our current plane image should now look like this:

Using Convolution Matrices

A convolution matrix, also known as a mask or a kernel, is a 3×3 or 5×5 matrix that is applied over an entire image. For this article, we will examine only 3×3 matrices.

For a 3×3 matrix, we select a 3×3 square in the image, and for each pixel, we multiply that pixel by its corresponding matrix position. We then set the pixel in the center of that 3×3 square to the average of those 9 pixels after the multiplication.

If you wanted this to output visually, you can simply set a pixel to 0 if it’s less than 0, and 255 if it’s greater than 255.

Immediately, you might realize that if we have to select a 3×3 square in the original image, then our convolution matrix would be useless if we selected the top left pixel. If the top left pixel is selected, then you wouldn’t be able to create a 3×3, since you would only have 4 pixels from the 3×3 (ie; you’d have a 2×2) and would be missing the remaining 5 pixels.

There are a wide variety of ways to handle these cases, although we won’t cover them in any depth in this article. For example, You could duplicate the 2×2 four times, by rotating the 2×2 around the center pixel to fill in the missing pixels, or you could just trivially set the missing pixels to 0 (results may be poor if you do this though).

There are massive lists of convolution matrices that can do all sorts of things from sharpening, blurring, detecting vertical lines, and detecting horizontal lines. Here’s our plane after applying a convolution matrix for detecting horizontal lines. Specifically, this matrix is [(-1, -1, -1), (2, 2, 2), (-1, -1, -1)]

Similarly, here’s the result after applying a convolution matrix for detecting vertical lines. The matrix for this one is [(-1, 2, -1), (-1, 2, -1), (-1, 2, -1)].

You might be wondering, “But how does this help me? It doesn’t reduce processing times at all!”. And you’re right. This only makes your processing time longer. However, notice that once you use convolution to extract out the high-level details you want, like edges, your image now has a lot of the excessive noise removed. For example, in the image above, you can see that the sky is no longer in the image.

This means that we’ve isolated the important parts of the images, which allows us to safely reduce the size of the resulting matrix without a huge loss in detail.

SIDE NOTE: You may be wondering why we can’t just downsize the image before we perform any processing steps on it. The reason for this is that if you downsize the image right away, you will almost always lose important detail. Additionally, downsizing an image can create artifacts, and if you are looking for particularly small details, like a 2-4 pixel pattern in a large image, you will almost certainly lose that detail when you scale down the image. This is why you should capture those details first before scaling down.

Pooling

In a nutshell, pooling is a technique to reduce the size of a matrix. You pool after you apply your convolutions, because each time you pool, you will lose some features.

Generally, each cycle of pooling will decrease the number of features in your image by some multiplicative constant. It’s trivial to see that if you continuously pool your image over and over again, you will eventually lose too much detail (like if you pooled until you just had a single 1×1 matrix).

Pooling works by first selecting an arbitrarily sized square. Let’s say you want to use a 4×4 square. The goal of pooling is to take this 4×4 square in a matrix, and reduce it to a single 1×1 matrix. This can be done in many ways. For example, max pooling is when you take the maximum value in that 4×4 matrix, average pooling is when you average all the values of the matrix, and min pooling is when you take the minimum value from the matrix.

As a rule of thumb, you will want to use max pooling since that captures the most prominent part of the 4×4 matrix. For example, in edge detection, you would want to use max pooling because it would downsize the matrix while still showing you the location of the edges.

What you would not use is min pooling, because if there is even a single cell where no edge was detected inside a 4×4 matrix that is otherwise full of edges, the pooling step would leave you with a value of 0, indicating that there was no edge in that 4×4 matrix.

For a better understanding of why you should pool, consider the fact that a 4K image is a 3840 x 2160 image, which is 8,294,400 individual features to process. Suppose we can process ten 4K images a second (82,940,000 features a second). Let’s compare the original 3840 x 2160 representation versus a 480 x 270 pooled representation.

# Images3840 x 2160 image (time)480 x 270 image (time)
101 second0.015625 seconds
1,00016.67 minutes1.56 seconds
1,000,00011.57 days26.04 minutes
1,000,000,00031.71 years18.0844 days

At ten 4K images a second, it would take over 30 years to process a million images, whereas it would only take 18 days if you had done pooling.

Conclusion

When processing images, especially high-resolution images, it’s important that you shrink down the number of features. This can be done through many methods. In this article, we covered converting an image to grayscale, as well as techniques such as convolution to extract important features, and then pooling to reduce the spatial complexity.

In this article, we compared the difference between pooling and not pooling, and found that the difference of analyzing a million 4K grayscale image without pooling would take 31 years, versus 18 days if we had pooled it down to a 480 x 270 image. However, not turning the images into grayscale can also have a noticeable effect.

As a final food for thought, if you had performed none of the optimizations mentioned in this article, analyzing a million full-color 4K resolution images with convolutions would take nearly an entire century, versus a measly 18 days if you had turned them into grayscale and then performed convolution and pooling.

In other words, with no optimizations, your image processing would take so long, that you could be rolling in your grave, and your program still wouldn’t be done running.

The Simplest Guide To Microservices

Almost every tutorial and article you’ll see on microservices begins with a fancy graph or drawing that looks something like this:

Except, unless you already understand microservices, this drawing tells you nothing. It looks like the UI calls a “microservice”, which calls a database. Not particularly enlightening.

So let’s get down to the real question — why? Why would anyone do it like this? What’s the rationale? And since this is The Simplest Guide To Microservices, we’ll start by looking at this issue from the very basics.

What Happens If I Don’t Use Microservices?

Imagine you have an app, and this app has two main components to it: an online store, and a blog. This is without microservices, so they’ll be combined inside of one app. This is called a monolithic app. The store can’t exist without the app.

Suppose the store and the blog have nothing in common — that is, the store will never request any information from the blog, and the blog will never request any information from the store. They are completely separate, decoupled pieces.

Now, for simplicity sake, let’s assume the store and blog can both only support one customer at a time. What would happen if the blog now has three customers, while the store still only has one? We wouldn’t be able to support the three customers on our blog, so we’d have to scale our monolithic app. We can do this by creating two more instances of our app.

Now we’ve got three instances of our app! But take a moment to see if you notice the issue with scaling it this way.

The issue is the store! The only reason we needed to scale our app was because we couldn’t support enough customers for our blog, but what about our store? Clearly, we didn’t need two extra stores too.

In other words, we didn’t actually want to scale our entire app. We just wanted to scale the blog, but since the blog and store are inside of one app, the only way to scale the store is to scale the entire app.

This is the first issue with monolithic apps, but there are other issues too.

Since you now know the basic idea behind a monolithic app, let’s add some coupling into the mix to make this more realistic. Suppose, instead, the store actually makes calls to the blog in order to query for the blog’s merchandise. In other words, the store needs the blog to be working for it to display whatever merchandise we have up on our blog.

The key thing to note here is what happens when the blog component crashes or dies. Without the blog component, the store doesn’t work, because it can’t fetch the list of merchandise without the blog.

Notice that this happens, even when we scale the app, meaning the entire app instances becomes useless.

This is another issue with monolithic apps, which is that they are not especially fault tolerant. If a major component crashes, all components that rely on it will also crash (unless you restart the component, or have some other way to restore functionality). Even in the case of restarting components, we really do not want to restart the store component if the blog component fails, because the blog is what caused the crash, not the store.

Wouldn’t it be nice if we could just point the store component to a different blog component if the one that it’s currently using fails?

As you’re probably noticing, you can’t have two blog instances in one app as per our design constraints, so this isn’t possible with our monolithic app approach (note that you could still technically do this in a monolithic app, but it’d be very cumbersome and would still have scaling issues). Microservices to the rescue!

Enter Microservices

A microservice architecture is essentially the opposite of a monolithic architecture. Instead of one app, containing all of the components, you simply separate out all of the components into their own apps.

Monolithic apps are basically just one giant app with many components. A microservice is just a tiny app that usually only contains one component.

We’ve added in the UI and the DB (database) parts into this diagram as well, to slowly increase the complexity of the architecture. Notice that because each microservice is an actual app, it needs to be able to exist on its own. This means that we can’t share one giant database connection pool like you can in a monolithic app. Each microservice should be able to establish its own connections to the database.

However, microservices still depend on each other. In this case, our store microservice needs to contact the blog microservice to get a list of merchandise. But since these are technically two separate apps, how do they communicate? The answer is HTTP requests!

If the store wants to fetch data from the blog, the only way to do it is through a RESTful API. Since the store and blog are separate in a microservice architecture, you cannot directly call the blog anymore as you could in a monolithic architecture.

Another crucial thing to note is that the store doesn’t really care who is on the other side of that GET request, so long as it gets a response. So this means we can actually add in a middleman on that GET request. This “middleman”, which is basically just a load balancer, will forward that GET request to a live blog, and then pass back the response.

So notice that it no longer matters if any individual blog instance dies. No store instance will die just because a blog died, because the two are completely decoupled by a RESTful API. If one blog dies, the load balancer will just give you a different, live instance!

And notice, too, that you don’t need to have an equal number of store and blog components like you do in a monolithic architecture. If you need 5000 blog instances, and 300 store instances, that’s completely okay. The two are separate apps, so you can scale them independent of each other!

Conclusion

We’ve taken a look at both monolithic and microservice architectures. In monolithic architectures, the only way to scale your app is to take the entire thing, with all of its components, and duplicate it. This is inefficient because you often only want to scale a specific component, and not the entire app.

Additionally, when you use a monolithic architecture, a single failure or crash can propogate throughout the entire app, causing massive failures. Since it is harder to implement redundancy (multiple copies of the same component) in a monolithic app, this is not a particularly easy problem to solve.

Microservices can also have a single point of failure as well, but because microservices are smaller, quicker to startup, and easier to scale, you can often create enough redundancy, or restore dead instances in time, to prevent catastrophic failures.

To make a microservice architecture work, it’s crucial that each microservice represents a single component. For example, the authentication for an app should be a microservice, the online store UI should be a microservice, and the financial transaction mechanism should be a separate microservice. The three of these together can make up an online store, but all three of them must have the ability to exist on their own.

Remember that the microservice architecture is not a silver bullet. It has its own disadvantages as well. For example, if your app has no need to scale (like if it only has a handful of users), then a microservice architecture is way overkill.

With that being said, I hope you’ve gained some insight on how microservices work, and how it compares to a monolithic approach.

Happy coding!

How To Maximize Job Security By Secretly Writing Bad Code

Disclaimer: While the tips in this code are absolutely true and will make your code unmaintainable, this post is satire and should be treated as such. Please don’t purposely write bad code in production.

By a sudden stroke of bad luck, half of your team has been laid off due to a lack of budget. Rumor has it that you’re next. Fortunately, you know a little secret trick to ensuring job security in your cushy software development position — by writing bad code of course!

After all, if no one can setup, deploy, edit, or read your code, then that means you’re now a “critical” member of the team. If you’re the only one who can edit the code, then you obviously can’t be fired!

But your code has to pass a bare minimum quality, or else others will catch on to how terrible and nefarious you are. That’s why today, I’m going to teach you how to maximize your job security by secretly writing bad code!

Couple Everything Together, Especially If It Has Side Effects

A little known secret is that you can write perfectly “clean” looking code, but still inject lots of potential bugs and issues into your code, just by unnecessarily flooding it with I/O and side effects.

For example, suppose you’re writing a feature that will accept a CSV file, parse and mutate it, insert the contents into a database, and then also insert those contents into a view via an API call to the database.

Like a good programmer, you could split out the obvious side effects (accepting the CSV, inserting data into a database, inserting data into a view, calling the API and fetching the data) into separate functions. But since you want to sneakily write bad code until the guise of being clean code, you shouldn’t do this.

What you should do, instead, is hardcode the CSV name and bundle all of the CSV parsing, mutation, and all of the insertion into one function. This guarantees that no one will ever be able to write a test for your code. Sure, someone could attempt to mock all of the side effects out, but since you’ve inconveniently bundled all of your side effects together, there isn’t any way for someone to easily do this.

How do we test this functionality? Is it even testable? Who knows?

If someone were insane enough to try, they would first have to mock the CSV out, then mock the CSV reading functionality, then mock the database, then mock the API call, and then finally test the mutation functionality using the three mocks.

But since we’ve gone through the lovely effort of putting everything in one function, if we wanted to test this for a JSON file instead, we would have to re-do all of the mocks. This is because we basically did an integration test on all of those components, rather than unit tests on the individual pieces. We’ve guaranteed that they all work when put together, but we haven’t actually proven that any of the individual components work at all.

The main takeaway here — insert as many side effects into as few functions as possible. By not separating things out, you force everyone to have to mock things in order to test them. Eventually, you get a critical number of side effects, at which point you need so many mocks to test the code that it is no longer worth the effort.

Hard to test code is unmaintainable code, because no sane person would ever refactor a code base that has no tests!

Create Staircases With Nulls

This is one of the oldest tricks in the book, and almost everyone knows this, but one of the easiest ways to destroy a code base is to flood it with nulls. Try and catch is just too difficult for you. And make sure you never use Options/Optionals/Promises/Maybes. Those things are basically monads, and monads are complicated.

You don’t want to learn new things, because that would make you a marketable and useful employee. So the best way to handle nulls is to stick to the old fashioned way of nesting if statements.

In other words, why do this:

try:
    database = mysql_connector.connect(...)
    cursor = mydb.cursor()
    query = "SELECT * FROM YourTable"
    cursor.execute(query)
    query_results = cursor.fetchall()
...
...
except:
....

When you could instead do this?

database = None
cursor = None
query = None
query_results = None

database = mysql_connector.connect(...)
if(database == None):
    print("Oh no, database failed to connect!")
    cursor = database.cursor()
    if(cursor == None):
        print("Oh no, cursor is missing!")
    else:
        query = "SELECT * FROM YourTable"
        if(query == None):
            print("Honestly, there's no way this would be None")
        else:
            cursor.execute(query)
            query_results = cursor.fetchall()
            if(query_results == None):
                print("Wow! I got the query_results successfully!")
            else:
                print("Oh no, query_results is None")

The dreaded downward staircase in this code represents your career and integrity as a programmer spiraling into the hopeless, bleak, and desolate void. But at least you’ve got your job security.

Write Clever Code/Abstractions

Suppose you’re, for some reason, calculating the 19428th Fibonacci term. While you could write out the iterative solution that takes maybe ten lines of code, why do that when you could instead write it in one line?

Using Binet’s formula, you can just approximate the term in a single line of code! Short code is always better than long code, so that means your one liner is the best solution.

But often times, the cleverest code is the code that abstracts for the sake of abstraction. Suppose you’re writing in Java, and you have a very simple bean class called Vehicle, which contains “Wheel” objects. Despite the fact that these Wheel objects only take one parameter for their constructor, and despite the fact that the only parameters that this car takes are its wheels, you know in your heart that the best option is to create a Factory for your car, so that all four wheels can be populated at once by the factory.

After all, factories equal encapsulation, and encapsulation equals clean code, so creating a CarFactory is obviously the best choice in this scenario. Since this is a bean class, we really ought to call it a CarBeanFactory.

Sometime later, we realize that some drivers might even have four different kinds of wheels. But that’s not an issue, because we can just make it abstract, so we now have AbstractBeanCarFactory. And we really only need one of these factories, and since the Singleton design pattern is so easy to implement, we can just turn this into a SingletonAbstractBeanCarFactory.

At this point, you might be shaking your head, thinking, “Henry, this is stupid. I might be trying to purposely write bad code for my own job security, but no sane engineer would ever approve that garbage in a code review.”

And so, I present to you Java’s Spring Framework, featuring:

Surely, no framework could do anything worse than that.

And you would be incredibly, bafflingly, and laughably wrong. Introducing, an abstraction whose name is so long that it doesn’t even fit properly on my blog: HasThisTypePatternTriedToSneakInSomeGenericOrParameterizedTypePatternMatchingStuffAnywhereVisitor

Conclusion

Bad code means no one can edit your code. If no one can edit your code, and you’re writing mission critical software, then that means you can’t be replaced. Instant job security!

In order to write subtle yet destructively bad code, remember to always couple things together, create massive staircases with null checks (under the guise of being “fault-tolerant” and “safe”), and to write as many clever abstractions as you can.

If you ever think you’ve gone over the top with a clever abstraction, you only have to look for a more absurd abstraction in the Spring framework.

In the event that anyone attempts to argue with your abstractions, gently remind them:

  1. Spring is used by many Fortune 500 companies.
  2. Fortune 500 companies tend to pick good frameworks.
  3. Therefore Spring is a good framework.
  4. Spring has abstractions like SimpleBeanFactoryAwareAspectInstanceFactory
  5. Therefore, these kinds of abstractions are always good and never overengineered.
  6. Therefore, your SingletonBeanInstanceProxyCarFactory is good and not overengineered.

Thanks to this very sound logic, and your clean-looking but secretly bad code, you’ve guaranteed yourself a cushy software development job with tons of job security.

Congratulations, you’ve achieved the American dream.