Programmers Need Intuition, Not Knowledge

Have you ever had a child ask you, “Why is the sky blue?”

If so, how would you respond? Would you say, “Well, you see, there are lots of tiny molecules in the atmosphere, and thanks to a phenomenon called Rayleigh scattering, blue light gets scattered more strongly than the other colors because blue light has a longer wavelength than the other colors.”

While this answer is correct and thorough, no child would understand this.

But instead, what happens when you explain it by showing a child a triangular prism with sunlight reflecting through it?

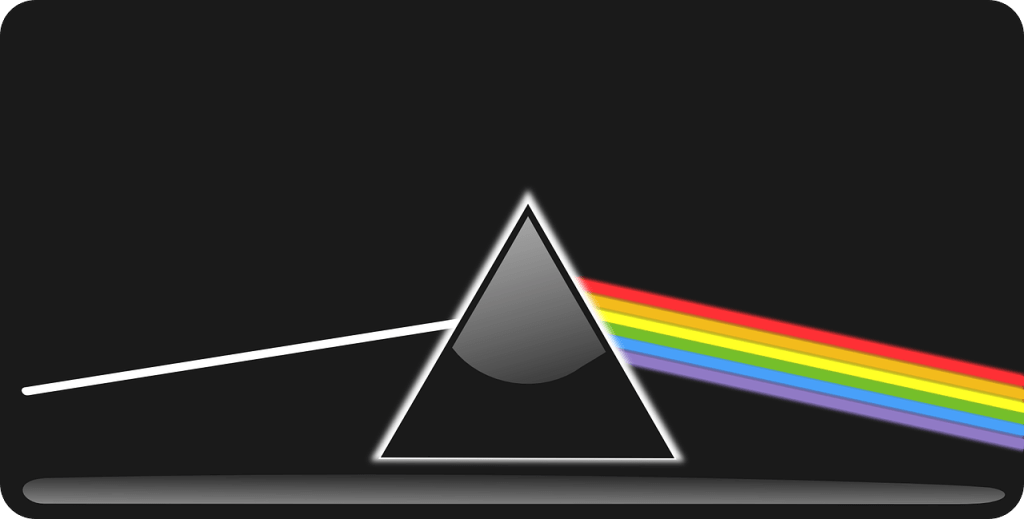
Visible light goes in, a spectrum of colors comes out. And just like how this prism can scatter light into different colors, the same thing happens in the sky, except it reflects off mostly blue instead.

How do you feel about this answer? From a technical aspect, it’s very hand-wavy and magical. There’s no explanation about why the scattering happens, or why visible light can even split into individual colors. But oddly enough, when you give this explanation to a child, they suddenly just understand it intuitively, so intuitively in fact that they’ll even be able to explain why a puddle can form a tiny little rainbow.

But we didn’t mention anything about puddles. Or the fact that visible light is a spectrum of wavelengths, with several bands that correspond to different colors. And yet the intuition and understanding is there. Isn’t that odd?


How Most Programmers Learn

It turns out that this principle applies to programmers as well. In my experience, after teaching programming for several years, many programmers fall into this pitfall because they “need to understand how everything works”.

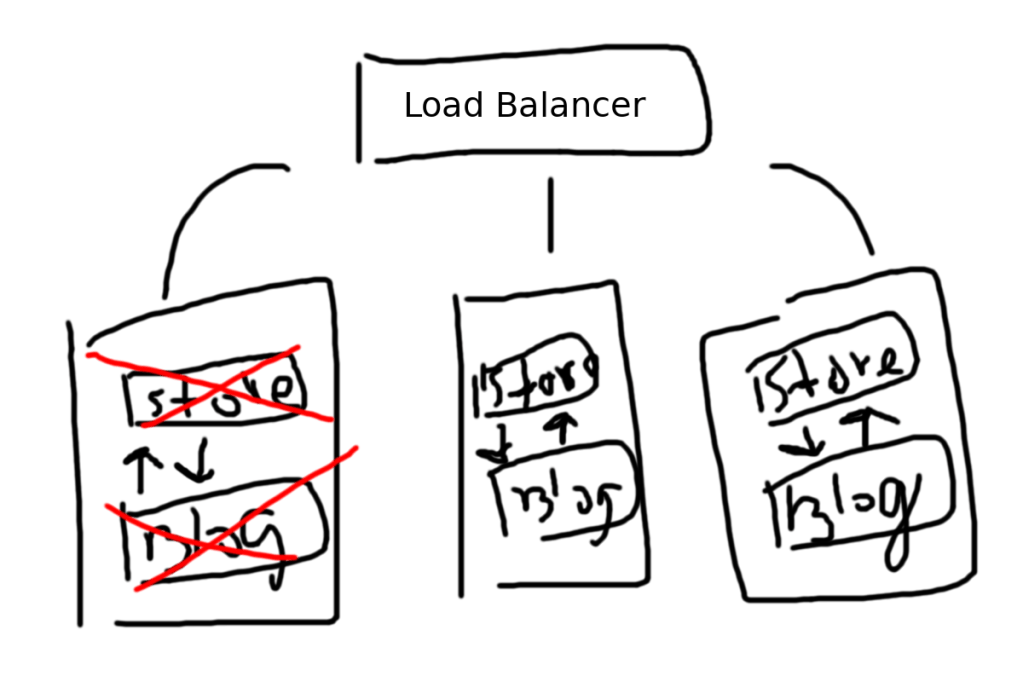
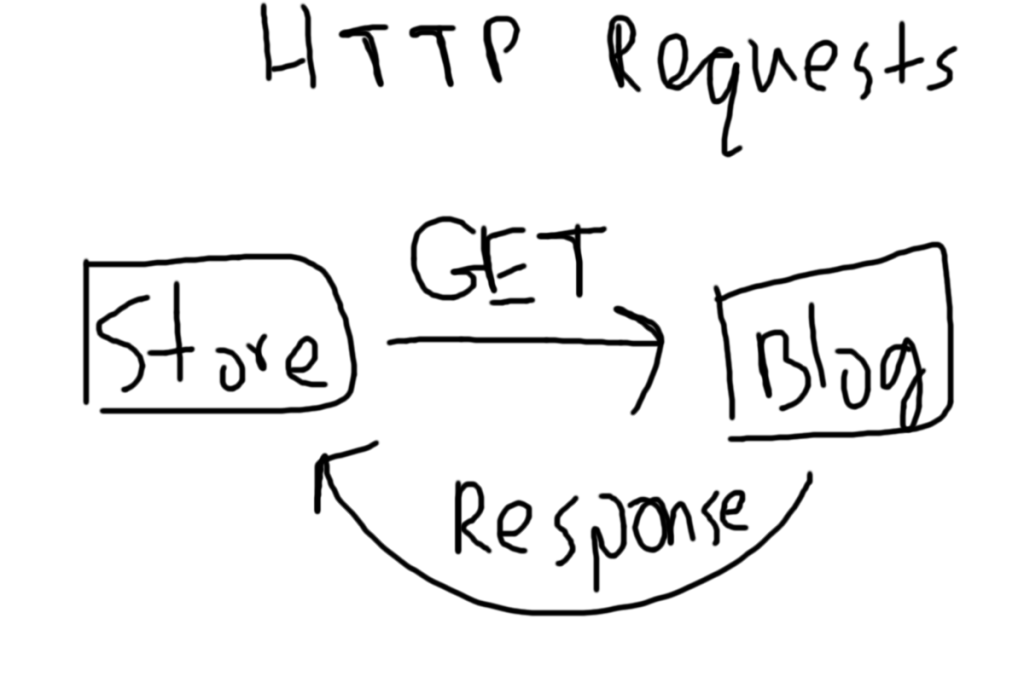
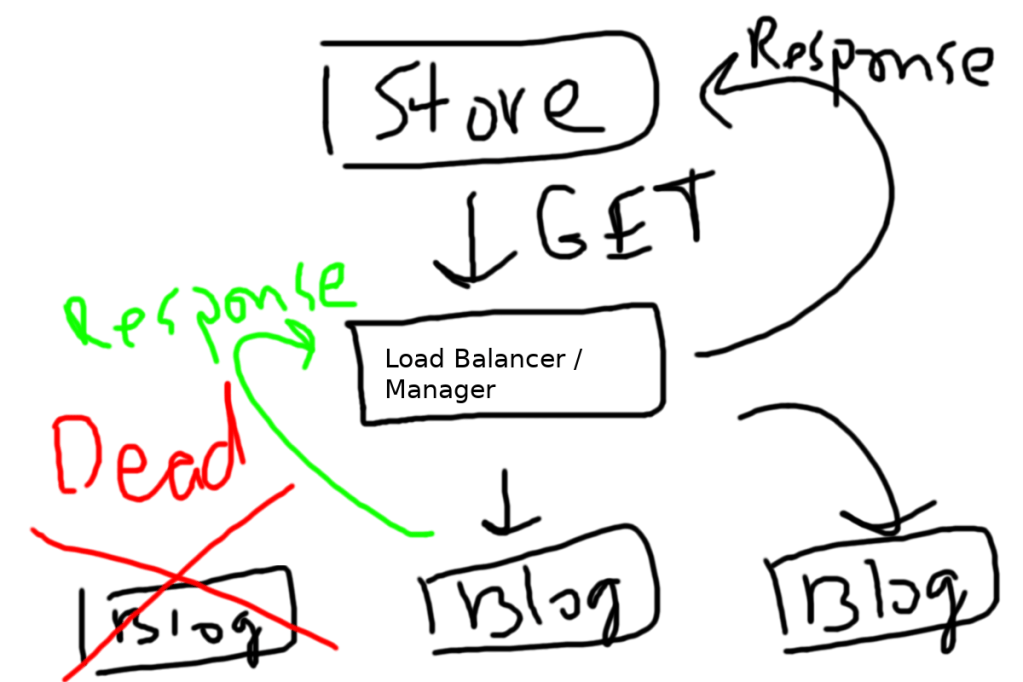
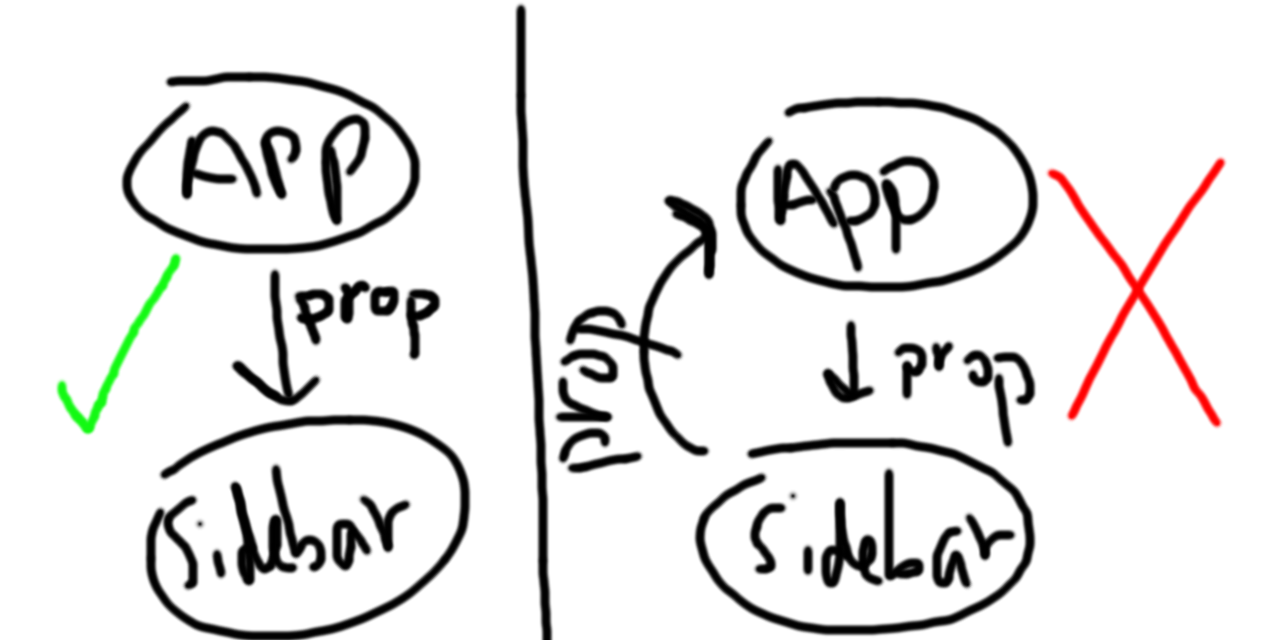
Let’s start with a simple example. You need to use Docker because you want to setup a scalable microservice configuration. To quickly summarize this for anyone unfamiliar with Docker, you’ll use Docker to put a tiny, individual piece of an app, like a login system, into a “container”. Then you can create many copies of those containers, which in turn allows you to handle a ton of logins at once.

Based on my own personal experiences, this is how most programmers would learn Docker.

First, they would open up Docker’s getting started page. After that, they would spend five minutes looking at the page before realizing that they don’t understand what a container is.

At this point, you might think, “If I don’t understand what a container is, then I can’t understand anything else on this page! I need to Google with a container is.”

So they go on to research about containers, and every post about containers on Docker’s documentation is going to talk about containers v.s. virtual machines. Eventually, they’ll bump into this diagram:

Image from Docker’s official documentation

And you might think, “Oh no! I don’t know how hypervisors work!”, which then leads you to spend another hour researching hypervisors.

By the time you finally understand what containers do, and how they work, you’ve already wasted several hours of research. Unfortunately, learning about this was only one piece of the puzzle. You still can’t Dockerize your app, and so you’ve actually made zero progress towards your goal of creating a scalable microservice setup.


A More Effective Way of Learning

The reason why the previous approach doesn’t work is because it causes you to care about too many details. When learning something new, it’s important to remember why you’re learning it. Are you learning it to do a particular goal? If so, then you only need just enough details to solve the task, and no more.

In the example I gave before with the “Why is the sky blue” question, it’s enough for you to know that things can refract light into individual colors. Knowing this fact gives you enough information to deduce that the sky, or something in the sky is refracting the light into blue light. You don’t need to know about the details of Rayleigh scattering, or the physics behind how the wavelength of a photon is affected when it collides into a molecule.

Similarly, you have to remember that your goal isn’t to “learn” Docker, but rather to use it to solve a particular problem. In this case, it’s enough to understand the very bare basics.

So how do you figure out what the bare basics are? It’s easy. You look at an example Docker setup. There are some really simple Docker setups, like the “Hello World!” Docker image. Once you’ve looked at one or two setups, it should be apparent that the bare necessities for a non-trivial app are:

  1. A Dockerfile
  2. Some source files that your Dockerfile will read from

In a nutshell, if this is how you learned Docker, your entire understanding of Docker boils down to this:

Without understanding any of Docker’s underlying workings, you should now be able to create simple Docker images without fail. Will you be able to do Docker images with volumes for storage persistence, intermediate layers, and complex networking? No, probably not. But the more important question is whether you had to learn all of those things before making your first Docker image.

From my experience with teaching programming to younger students (elementary school to high school students), I’ve realized that the fastest way to learn something is to just directly do it, and learn whatever you need on the spot. Any information that you don’t currently need is simply ignored until necessary.

For example, even though the shabby diagram above doesn’t include anything about networking or persistence, it’s trivial to just find an example of networking with Docker, and applying it to your setup. In fact, even when it comes to images and containers, there’s no understanding outside of “Here is an image. It creates a container”, because you don’t need it!

Suppose that in the future, you have a new requirement, which is that your image sizes need to be tinier. Then, and only then, should you decide to figure out how images actually work. If image size and performance is not a concern, then there is no reason for you to learn about how images work.


So You’re Saying Learning Is Bad?

At this point, you’re probably thinking that this ideology is insane, and that no one should learn things so haphazardly. Ignoring as many details as possible may seem jarring to many people, but to me, this is a matter of intuition versus understanding.

While it’s true that you’re more likely to run into unexpected problems by learning in such a hand-wavy way, learning this way minimizes the risk that you produce no output at all. Often times, when writing software, the problem at hand is this: Do you have a solution? Or do you not have a solution? Very rarely is it, “Is this solution fast/robust/flexible enough?”, because solutions can always be iterated upon, but you can’t iterate on a solution if you have no solution.

Returning back to the issue with Docker, you can understand everything there is to understand about Docker, you can list all of the intricacies that power it, and explain all of the “magic” behind Docker, but if you can’t create a Dockerized app, then you don’t intuitively understand Docker. If you were tasked tomorrow with creating a Docker image, and you couldn’t do it, then that should be an immediate red flag that you don’t actually understand Docker.

Reading is not a substitute for doing.

Just like how a blind physicist can know everything everything there is to know about the color red, like its wavelength, and how the optical cones in your eye can detect red, a blind physicist will still never intuitively know what “red” is, unless he or she sees it. Non-blind people who have seen the color red already know everything that they need in order to intuitively understand what “red” is, even if they don’t know the physics behind it.

Similarly, you can know everything there is to know about Docker, but if you’ve never used Docker to create containers, then you’ll never build your intuition for what Docker is, and how it feels to use Docker.

However, unlike the blind physicist, it’s entirely possible for you to learn everything there is to know about Docker, and then use Docker. But from my experience, doing it in this order is incredibly inefficient because you often times learn grossly more than needed.

If you’re still not fully convinced, consider this question:

Is it possible for a person to learn how to ride a bike solely by reading about how to do it? And if so, would your skill in riding a bike be better after 10 hours of reading about bike riding, or 10 hours of physically riding a bike?

Advertisement

The Simplest Guide To Microservices

Almost every tutorial and article you’ll see on microservices begins with a fancy graph or drawing that looks something like this:

Except, unless you already understand microservices, this drawing tells you nothing. It looks like the UI calls a “microservice”, which calls a database. Not particularly enlightening.

So let’s get down to the real question — why? Why would anyone do it like this? What’s the rationale? And since this is The Simplest Guide To Microservices, we’ll start by looking at this issue from the very basics.

What Happens If I Don’t Use Microservices?

Imagine you have an app, and this app has two main components to it: an online store, and a blog. This is without microservices, so they’ll be combined inside of one app. This is called a monolithic app. The store can’t exist without the app.

Suppose the store and the blog have nothing in common — that is, the store will never request any information from the blog, and the blog will never request any information from the store. They are completely separate, decoupled pieces.

Now, for simplicity sake, let’s assume the store and blog can both only support one customer at a time. What would happen if the blog now has three customers, while the store still only has one? We wouldn’t be able to support the three customers on our blog, so we’d have to scale our monolithic app. We can do this by creating two more instances of our app.

Now we’ve got three instances of our app! But take a moment to see if you notice the issue with scaling it this way.

The issue is the store! The only reason we needed to scale our app was because we couldn’t support enough customers for our blog, but what about our store? Clearly, we didn’t need two extra stores too.

In other words, we didn’t actually want to scale our entire app. We just wanted to scale the blog, but since the blog and store are inside of one app, the only way to scale the store is to scale the entire app.

This is the first issue with monolithic apps, but there are other issues too.

Since you now know the basic idea behind a monolithic app, let’s add some coupling into the mix to make this more realistic. Suppose, instead, the store actually makes calls to the blog in order to query for the blog’s merchandise. In other words, the store needs the blog to be working for it to display whatever merchandise we have up on our blog.

The key thing to note here is what happens when the blog component crashes or dies. Without the blog component, the store doesn’t work, because it can’t fetch the list of merchandise without the blog.

Notice that this happens, even when we scale the app, meaning the entire app instances becomes useless.

This is another issue with monolithic apps, which is that they are not especially fault tolerant. If a major component crashes, all components that rely on it will also crash (unless you restart the component, or have some other way to restore functionality). Even in the case of restarting components, we really do not want to restart the store component if the blog component fails, because the blog is what caused the crash, not the store.

Wouldn’t it be nice if we could just point the store component to a different blog component if the one that it’s currently using fails?

As you’re probably noticing, you can’t have two blog instances in one app as per our design constraints, so this isn’t possible with our monolithic app approach (note that you could still technically do this in a monolithic app, but it’d be very cumbersome and would still have scaling issues). Microservices to the rescue!

Enter Microservices

A microservice architecture is essentially the opposite of a monolithic architecture. Instead of one app, containing all of the components, you simply separate out all of the components into their own apps.

Monolithic apps are basically just one giant app with many components. A microservice is just a tiny app that usually only contains one component.

We’ve added in the UI and the DB (database) parts into this diagram as well, to slowly increase the complexity of the architecture. Notice that because each microservice is an actual app, it needs to be able to exist on its own. This means that we can’t share one giant database connection pool like you can in a monolithic app. Each microservice should be able to establish its own connections to the database.

However, microservices still depend on each other. In this case, our store microservice needs to contact the blog microservice to get a list of merchandise. But since these are technically two separate apps, how do they communicate? The answer is HTTP requests!

If the store wants to fetch data from the blog, the only way to do it is through a RESTful API. Since the store and blog are separate in a microservice architecture, you cannot directly call the blog anymore as you could in a monolithic architecture.

Another crucial thing to note is that the store doesn’t really care who is on the other side of that GET request, so long as it gets a response. So this means we can actually add in a middleman on that GET request. This “middleman”, which is basically just a load balancer, will forward that GET request to a live blog, and then pass back the response.

So notice that it no longer matters if any individual blog instance dies. No store instance will die just because a blog died, because the two are completely decoupled by a RESTful API. If one blog dies, the load balancer will just give you a different, live instance!

And notice, too, that you don’t need to have an equal number of store and blog components like you do in a monolithic architecture. If you need 5000 blog instances, and 300 store instances, that’s completely okay. The two are separate apps, so you can scale them independent of each other!

Conclusion

We’ve taken a look at both monolithic and microservice architectures. In monolithic architectures, the only way to scale your app is to take the entire thing, with all of its components, and duplicate it. This is inefficient because you often only want to scale a specific component, and not the entire app.

Additionally, when you use a monolithic architecture, a single failure or crash can propogate throughout the entire app, causing massive failures. Since it is harder to implement redundancy (multiple copies of the same component) in a monolithic app, this is not a particularly easy problem to solve.

Microservices can also have a single point of failure as well, but because microservices are smaller, quicker to startup, and easier to scale, you can often create enough redundancy, or restore dead instances in time, to prevent catastrophic failures.

To make a microservice architecture work, it’s crucial that each microservice represents a single component. For example, the authentication for an app should be a microservice, the online store UI should be a microservice, and the financial transaction mechanism should be a separate microservice. The three of these together can make up an online store, but all three of them must have the ability to exist on their own.

Remember that the microservice architecture is not a silver bullet. It has its own disadvantages as well. For example, if your app has no need to scale (like if it only has a handful of users), then a microservice architecture is way overkill.

With that being said, I hope you’ve gained some insight on how microservices work, and how it compares to a monolithic approach.

Happy coding!

How To Maximize Job Security By Secretly Writing Bad Code

Disclaimer: While the tips in this code are absolutely true and will make your code unmaintainable, this post is satire and should be treated as such. Please don’t purposely write bad code in production.

By a sudden stroke of bad luck, half of your team has been laid off due to a lack of budget. Rumor has it that you’re next. Fortunately, you know a little secret trick to ensuring job security in your cushy software development position — by writing bad code of course!

After all, if no one can setup, deploy, edit, or read your code, then that means you’re now a “critical” member of the team. If you’re the only one who can edit the code, then you obviously can’t be fired!

But your code has to pass a bare minimum quality, or else others will catch on to how terrible and nefarious you are. That’s why today, I’m going to teach you how to maximize your job security by secretly writing bad code!

Couple Everything Together, Especially If It Has Side Effects

A little known secret is that you can write perfectly “clean” looking code, but still inject lots of potential bugs and issues into your code, just by unnecessarily flooding it with I/O and side effects.

For example, suppose you’re writing a feature that will accept a CSV file, parse and mutate it, insert the contents into a database, and then also insert those contents into a view via an API call to the database.

Like a good programmer, you could split out the obvious side effects (accepting the CSV, inserting data into a database, inserting data into a view, calling the API and fetching the data) into separate functions. But since you want to sneakily write bad code until the guise of being clean code, you shouldn’t do this.

What you should do, instead, is hardcode the CSV name and bundle all of the CSV parsing, mutation, and all of the insertion into one function. This guarantees that no one will ever be able to write a test for your code. Sure, someone could attempt to mock all of the side effects out, but since you’ve inconveniently bundled all of your side effects together, there isn’t any way for someone to easily do this.

How do we test this functionality? Is it even testable? Who knows?

If someone were insane enough to try, they would first have to mock the CSV out, then mock the CSV reading functionality, then mock the database, then mock the API call, and then finally test the mutation functionality using the three mocks.

But since we’ve gone through the lovely effort of putting everything in one function, if we wanted to test this for a JSON file instead, we would have to re-do all of the mocks. This is because we basically did an integration test on all of those components, rather than unit tests on the individual pieces. We’ve guaranteed that they all work when put together, but we haven’t actually proven that any of the individual components work at all.

The main takeaway here — insert as many side effects into as few functions as possible. By not separating things out, you force everyone to have to mock things in order to test them. Eventually, you get a critical number of side effects, at which point you need so many mocks to test the code that it is no longer worth the effort.

Hard to test code is unmaintainable code, because no sane person would ever refactor a code base that has no tests!

Create Staircases With Nulls

This is one of the oldest tricks in the book, and almost everyone knows this, but one of the easiest ways to destroy a code base is to flood it with nulls. Try and catch is just too difficult for you. And make sure you never use Options/Optionals/Promises/Maybes. Those things are basically monads, and monads are complicated.

You don’t want to learn new things, because that would make you a marketable and useful employee. So the best way to handle nulls is to stick to the old fashioned way of nesting if statements.

In other words, why do this:

try:
    database = mysql_connector.connect(...)
    cursor = mydb.cursor()
    query = "SELECT * FROM YourTable"
    cursor.execute(query)
    query_results = cursor.fetchall()
...
...
except:
....

When you could instead do this?

database = None
cursor = None
query = None
query_results = None

database = mysql_connector.connect(...)
if(database == None):
    print("Oh no, database failed to connect!")
    cursor = database.cursor()
    if(cursor == None):
        print("Oh no, cursor is missing!")
    else:
        query = "SELECT * FROM YourTable"
        if(query == None):
            print("Honestly, there's no way this would be None")
        else:
            cursor.execute(query)
            query_results = cursor.fetchall()
            if(query_results == None):
                print("Wow! I got the query_results successfully!")
            else:
                print("Oh no, query_results is None")

The dreaded downward staircase in this code represents your career and integrity as a programmer spiraling into the hopeless, bleak, and desolate void. But at least you’ve got your job security.

Write Clever Code/Abstractions

Suppose you’re, for some reason, calculating the 19428th Fibonacci term. While you could write out the iterative solution that takes maybe ten lines of code, why do that when you could instead write it in one line?

Using Binet’s formula, you can just approximate the term in a single line of code! Short code is always better than long code, so that means your one liner is the best solution.

But often times, the cleverest code is the code that abstracts for the sake of abstraction. Suppose you’re writing in Java, and you have a very simple bean class called Vehicle, which contains “Wheel” objects. Despite the fact that these Wheel objects only take one parameter for their constructor, and despite the fact that the only parameters that this car takes are its wheels, you know in your heart that the best option is to create a Factory for your car, so that all four wheels can be populated at once by the factory.

After all, factories equal encapsulation, and encapsulation equals clean code, so creating a CarFactory is obviously the best choice in this scenario. Since this is a bean class, we really ought to call it a CarBeanFactory.

Sometime later, we realize that some drivers might even have four different kinds of wheels. But that’s not an issue, because we can just make it abstract, so we now have AbstractBeanCarFactory. And we really only need one of these factories, and since the Singleton design pattern is so easy to implement, we can just turn this into a SingletonAbstractBeanCarFactory.

At this point, you might be shaking your head, thinking, “Henry, this is stupid. I might be trying to purposely write bad code for my own job security, but no sane engineer would ever approve that garbage in a code review.”

And so, I present to you Java’s Spring Framework, featuring:

Surely, no framework could do anything worse than that.

And you would be incredibly, bafflingly, and laughably wrong. Introducing, an abstraction whose name is so long that it doesn’t even fit properly on my blog: HasThisTypePatternTriedToSneakInSomeGenericOrParameterizedTypePatternMatchingStuffAnywhereVisitor

Conclusion

Bad code means no one can edit your code. If no one can edit your code, and you’re writing mission critical software, then that means you can’t be replaced. Instant job security!

In order to write subtle yet destructively bad code, remember to always couple things together, create massive staircases with null checks (under the guise of being “fault-tolerant” and “safe”), and to write as many clever abstractions as you can.

If you ever think you’ve gone over the top with a clever abstraction, you only have to look for a more absurd abstraction in the Spring framework.

In the event that anyone attempts to argue with your abstractions, gently remind them:

  1. Spring is used by many Fortune 500 companies.
  2. Fortune 500 companies tend to pick good frameworks.
  3. Therefore Spring is a good framework.
  4. Spring has abstractions like SimpleBeanFactoryAwareAspectInstanceFactory
  5. Therefore, these kinds of abstractions are always good and never overengineered.
  6. Therefore, your SingletonBeanInstanceProxyCarFactory is good and not overengineered.

Thanks to this very sound logic, and your clean-looking but secretly bad code, you’ve guaranteed yourself a cushy software development job with tons of job security.

Congratulations, you’ve achieved the American dream.

The Five Year Old’s Guide To ReactJS

ReactJS is a front-end library that only handles the “view” side of a website. In other words, ReactJS only handles the user interface, meaning you would have to get a separate library to manage the backend.

Fortunately, ReactJS is one of easier front-end libraries to learn because of its intuitive and straightforward nature. With that being said, “intuitive” is a rather subjective term, and since this is the five year old’s guide to ReactJS, let’s jump right into how ReactJS works with a simple analogy.

lego-3388163_1920

ReactJS is basically a Lego set. Like how a Lego building is made out of smaller Legos, a ReactJS website is made from smaller components, which are reusable bundles of HTML and JavaScript (React bundles them together into a DSL called JSX). Each component can store its own state, and can be passed in “props”, which allow you to customize the component’s behavior.

Making a UI with ReactJS is incredibly easy, since you are effectively connecting and stacking a bunch of components together until you have a full website. Let’s take a simple example.

DivAB.png

Let’s start with a simple page that we’ll divide into two divs. Now let’s suppose we’d like to put a sidebar into div A. This sidebar should have clickable links. How would we do this?

First, we would create a blank component called “Sidebar”.

ComponentSidebar1.png

Remember that components are just bundles of HTML and JavaScript. So from here, inserting a bunch of links with some CSS styling would give us a functional sidebar component.

ComponentSidebar2

In case you’re the “show me the code’ kind of person, here’s an unstyled version of what that component might look like in ReactJS.

class Sidebar extends React.Component {    
  render() {    
    return (    
      <div>    
        <ul>
          <li><a href="/home">Home</a></li>
          <li><a href="/about">About</a></li>
          <li><a href="/etc">Etc</a></li>
        </ul>
      </div>
    );    
  }    
}    

Now, we actually have to create a component, which we’ll call “App”, to represent the entire web page. Once we’ve created this, we can then insert our component into the “App” component. In other words, we’re building components out of other, smaller components.

const App = () => {
  return (
    <div className="App">
      <div className="divA">
          // This is the sidebar component 
          // that we just built!
          <Sidebar></Sidebar>
      </div>
      <div className="divB">
        // Put content in div B later
      </div>
    </div>
  );
}

From a graphical perspective, this is what we’ve done (both App and Sidebar are components):

This is fine and all, but suppose you wanted this sidebar to have different links, or perhaps have the links updated based on some sort of database query. With our current implementation, we have no way of doing this without editing the Sidebar class and hard-coding those links.

Fortunately, there’s a solution for this, which is to use props. Props are like inputs for a component, and with them, you can dynamically and flexibly configure a component. Just like how functions can accept parameters, components can accept props.

However, there are two rules for using props.

  1. Components shouldn’t mutate their props
  2. Components must only pass their props and any other data downstream.

The first rule just means that if you get some props as input, they should not change. The second rule isn’t a hard and fast rule, but if you want clean, debuggable code, you should try your best to always pass data/props unidirectionally.

DON’T pass props upwards to a component’s parent. The short version of why is that passing props upwards causes your components to be tightly coupled together. What you really want is a bunch of components that don’t care about who their parent or child components are. If you ever have to pass a prop up the hierarchy, you’re probably doing something wrong.

With that being said, one of the most common ways to use props is through props.children, which is best explained through a code example.

class Sidebar extends React.Component {    
  constructor(props){
    super(props);
  }

  render() {    
    return (    
      <div>    
        <ul>
          {props.children}
        </ul>
      </div>
    );    
  }    
}

Props are used for when you want to configure components in a flexible way. In this example, the Sidebar component no longer has pre-defined links anymore. Instead, you now need to pass them in via the App component.

const App = () => {
  return (
    <div className="App">
      <div className="divA">
          // The stuff in-between the Sidebar tags
          // is the props.children
          <Sidebar>
            <li><a href="/home">Home</a></li>
            <li><a href="/about">About</a></li>
            <li><a href="/etc">Etc</a></li>
          </Sidebar>
      </div>
      <div className="divB">
        // Put content in div B later
      </div>
    </div>
  );
}

This means you can now create infinitely many combinations of the Sidebar component, each one having whatever links you want!

const App = () => {
  return (
    <div className="App">
      <div className="divA">
          // In the diagram below, blue text
          <Sidebar>
            <li><a href="/home">Home</a></li>
            <li><a href="/about">About</a></li>
            <li><a href="/etc">Etc</a></li>
          </Sidebar>
 
          // In the diagram below, red text
          <Sidebar>
            <li><a href="/contact">Contact</a></li>
            <li><a href="/shop">Shop</a></li>
          </Sidebar>
      </div>
      <div className="divB">
        // Put content in div B later
      </div>
    </div>
  );
}

You can even pass in props through the component’s field! Let’s say you have a “Profile” page, and you need to change the “Name” section based on who is logged in. With components, you can simply have the parent get the name, and then pass that name as a prop to the required children components!

const Profile = (props) => {
  return (
    <div className="Profile">
      // You can define a function to fetch
      // the name from the backend, and then
      // pass it into the { ..... } 

      // Here is a hard-coded example
      // <NameParagraph personName="John">
      // </NameParagraph>
      <NameParagraph personName="{ .... }>
      </NameParagraph>
    </div>
  );
}

class NameParagraph extends React.Component {    
  constructor(props){
    super(props);
  }

  render() {    
    return (    
      <div>    
        {props.personName}
      </div>
    );    
  }    
}

Notice that there are no weird shenanigans happening here. The NameParagraph is not fetching the name on its own, it isn’t passing any callbacks or props to its parent, it’s a simple downstream flow of data.

States, props, and components form the core of how React works at a fundamental level. You create components, and then weave them together to create larger components. Once you’ve done this enough times, you’ll finally have one giant component that makes up your web page.

This modular approach, along with the downstream flow of data, makes debugging a fairly simple process. This is largely because components are supposed to exist independent of other components.

Just like how you can detach a Lego piece from a giant Lego sculpture and use it anywhere else, in any other Lego project, you should be able to take any component in your code and embed it anywhere else in any other component.

Here’s a short and sweet haiku to sum up this all up:

When using React

Code as if your components

Were Lego pieces.

Why You’ll Probably Never Use Haskell in Production

If you’ve ever chatted with a Haskell programmer, you’ll probably hear that using Haskell in production is one of the greatest joys in life. But the grim reality is that Haskell just doesn’t quite work out in most corporate environments. As a pure functional programming language that was born from the depths of academia, there are several issues that make most developers hesitant to adopt Haskell.

So without further-a-do, I’m going to explain to you why you’ll probably never use Haskell in production.


Haskell isn’t a popular programming language


Unfortunately, the reality of Haskell is that very few people know how to code in Haskell, and even fewer are good enough to use it to the same level of productivity as the average Python or Java developer. This causes two big issues.

  1. Hiring a Haskell developer is much harder than hiring a Java, C++, or Python developer.
  2. Teams are unlikely to switch to Haskell because the majority of team members probably won’t know Haskell

Because of these two issues, it’s nearly impossible to use Haskell in production without having a team that is already fluent in Haskell. However, because it’s much harder to hire a Haskell developer than a Java/Python developer, it also becomes highly unlikely that a team of Haskellers will ever be formed.

One common argument is that if Haskell is a perfect fit for your business requirements, then you can just teach your team Haskell. After all, developers are capable of learning new technology stacks on the fly, so there’s no need for everyone to already know Haskell.

While this sounds good on paper, it’s not actually possible for developers to just “learn” Haskell, because…


Haskell has a massive learning curve


Any developer worth their salt should be able to learn a new OOP programming language in under two weeks. If you already know a couple of OOP languages, then learning another OOP language is incredibly easy, because all of your knowledge transfers over.

But Haskell doesn’t work in the same way, because it’s a completely different paradigm, and sets itself apart even from other FP languages. Its learning curve is by far the steepest out of any programming language I’ve worked with. Not to mention, it’s probably one of the few programming languages in the world where people will endorse reading and sharing research papers to learn Haskell.

That’s not all though, because when it comes to Haskell, your programming experience works against you. It doesn’t take two weeks to learn Haskell. It takes months to learn Haskell, and likely several more to be productive in it. The issue is that since you already have certain expectations of what programming is about, you’ll have preconceptions on how things might be done in Haskell. And all of those preconceptions will be wrong.

For example, in most OOP languages (eg; Java and C#), a function that returns an integer doesn’t really return an integer. It returns an integer or null, and this is a problem in Haskell. In Haskell, if your value has a chance of returning “null”, then you need to wrap it with the Maybe monad.

But why do we even need monads? In an OOP language, everyone got along just fine without them (mostly by doing null checks everywhere).  So why do we need monads in Haskell if we never had to use one in any other programming language?

And what is a monad anyway? Unfortunately, monads are notoriously hard to explain. They’re so hard, in fact, that there’s an entire meme about monad tutorials. Some people will tell you that monads are burritos, others will say monads are boxes, and really, none of them will do much to help you understand monads. You’ll have to work with monads in order to understand them, and when you do understand them, you’ll wonder why you were ever confused about them in the first place. 

When it comes to Haskell, monads are essentially brick walls for beginners. Most people will simply quit when they realize that almost every Haskell library in the world requires monads. But suppose someone does get over that gap. Understanding monads in general, and understanding monads in a standard Haskell library are two completely separate things, and so we see our third problem.


Haskell has very few mature and documented libraries


Technically, I’m cheating by listing two points in one, but they’re both very relevant to the issue at hand.

Firstly, when it comes to libraries, Haskell only has a handful of good libraries. These are the ones that almost everyone knows — Parsec, Yesod, pandocaeson, etc. These libraries have good documentation, in fact, some of them are spectacular, like how Yesod literally has a book for its documentation.

But those are just the mature and well-known libraries. But what if you want to use some relatively less well-known libraries? Tough luck, because those libraries almost never have any documentation.

In fact, when it comes to documentation, a lot of experienced Haskellers will tout that the only documentation they need are the function names and type signatures. And it’s true, you can usually figure out a lot from those two, and the Theorems for Free paper is a great read if you’re looking to learn more.

But is it really enough? For most developers, we want to see example code. For popular libraries, sure, there are thousands of examples, but for a smaller library? You’d be lucky for them to even have a useful README page. Working with poor, undocumented Haskell libraries is something you need to experience for yourself to understand why this is such a deal breaker.

All-in-all, Haskell’s poor library ecosystem makes it incredibly risky for anyone to use Haskell as a true “general purpose” programming language, because Haskell only has mature libraries for a small handful of fields. If your problem domain isn’t completely solved by some combination of Haskell’s popular libraries, then you should probably choose a different language.


Conclusion


If you’re looking to use a functional programming language in a production environment, Haskell is likely a bad call.

Very few people know Haskell to start with, and its insane learning curve means that it will take a long time before a developer reaches a proficient level with Haskell. Combine this with Haskell’s poor library ecosystem, and any plans for using Haskell in production will likely come to a grinding halt.

For a normal production environment, with a normal team, you are better off using F# or Clojure. Both of these languages have much more gentle learning curves, better documentation, and a huge library ecosystem since they were built with interoperability in mind. F# has complete access to all .NET libraries (and it’s directly supported by Microsoft!), and Clojure runs on the JVM, so you can run any Java library on it. Both of these are much safer choices than Haskell, and if neither of them work out, there’s always the option of using Scala (which also runs on the JVM).

But maybe you’re one of the lucky few who are working on a corporate Haskell project, and there are several examples, like how Facebook created Haxl and Sigma for spam detection.

But these are the exceptions, rather than the rule. Most of the time, people just want to get things done, and unless the stars align with you having exactly the right team with exactly the right problem, Haskell is almost never going to provide a solution that is the fastest, safest, nor the cheapest.

Why I Will Never Use DRM Protection On My Books

When I tell other bloggers that I don’t use DRM on my e-books, they look at me as if I’m insane. If you’re not familiar with DRM, DRM is Digital Rights Management, and it’s basically copyright protection for your books. It works by using software to block unauthorized access to content, often by forcing you to use a specific ebook-reader.

In the case of my book, The Mostly Mathless Guide To TensorFlow Machine Learning, if I had applied DRM onto my ebook, it would mean that you’d have to login through Amazon’s services in order to read the book, and that you’d have to use their specific ebook reader. As you can see, DRM allows you to protect your books from piracy, but my book doesn’t have any DRM at all. But why?

The first thing to recognize is that there are three core assumptions that are being made here:

  1. The assumption that all consumers will pirate your book if given the chance, instead of buying it legally.
  2. The assumption that DRM is effective at protecting your ebooks and will boost sales.
  3. The assumption that DRM is not harmful to your readers.

With that begin said, let’s analyze each of these one at a time.


Are Consumers Just Evil Pirates?


A lot of people are under the impression that if people can obtain an ebook illegally, then they will. Fortunately, this misconception is the easiest one to debunk with statistics, as this one isn’t even remotely true. According to a study of about 35,000 individuals, only “5% said that they currently pirate books”. If we assume that consumers will just pirate everything, then we also run the risk of pessimistically assuming that consumers are immoral and will illegally steal from authors if given the chance.

However, you might be thinking that 5% is still a significant number of pirates, and you would be right. If we only looked at this single point, then any normal person would conclude that adding DRM to your books would give a slight boost to sales.

So what does this mean? That DRM is the way to go, and that it’ll really protect your book from piracy and boost your sales? Well, not exactly.


Is DRM Effective At Protecting Your Ebooks, And Will It Boost Sales?


If you’re reading this blog, then you’re probably a programmer or computer scientist. If so, then you already know the answer to this question. DRM is a complete joke, and almost every tech-savvy person knows how easy it is to bypass DRM protections. In the case of my ebook, The Mostly Mathless Guide To TensorFlow Machine Learning, there’s basically no point in adding DRM protection, because my target audience is tech-savvy programmers. If they wanted to crack the DRM, they could easily do so.

Even Tim O’Reilly, the founder of O’Reilly Media, hates DRM. And it should be noted that O’Reilly Media, one of the largest and most famous programming/technology book publisher in the United States, doesn’t use any DRM for any of its books. This is already a huge red flag for DRM.

In fact, DRM is so ineffective that the music industry doesn’t even use DRM to protect its audio files anymore, and removing DRM from their music actually boosts sales by 10%! It turns out that people who pirate music actually end up spreading the word about said music, causing an increase in popularity and sales. And people who pirate music may eventually even become future, paying consumers. Less popular albums even managed to increase their sales by a whopping 30%, just by removing DRM from their audio files.


Is DRM Harmful To Your Readers?


The short answer is yes.

The long answer is also yes, because it inhibits innovation, research, and is blatantly against the principles of fair use.

Suppose you were to purchase a physical book from a store. You are now free to do whatever you want with that book. You could burn it, resell it, store it away in a box, share it with your friends, or use and reproduce it for research, analytical, or educational purposes. Now suppose a team of researchers wanted to use a single chapter from your book as a source. Due to fair use, there is no issue in passing the book around, and printing out paper copies of that chapter, as long as the book is used for a limited period of time and is used strictly for research purposes.

Now what if that same team of researchers had bought a DRM protected ebook? Well, they’re out of luck, because DRM prevents them from sending a copy of the ebook to their peers, and it also prevents them from printing out a physical copy of the ebook. If that team of researchers wanted to read through this book in parallel, they would need to buy three copies of the ebook, even though this situation should clearly fall under fair use laws.

Most notably, if you’re reviewing a DRM-protected ebook (eg; if you’re a professional book reviewer), you aren’t even allowed to share that DRM-protected ebook to your work colleagues, because the DRM literally prevents you from doing so.

Not only that, when you use DRM on your ebooks, you are forcing your reader into using a specific platform or software to read that ebook. Suppose a reader wants to use their own personal ebook reader, instead of the one that the platform is forcing them to use. Unfortunately, they can’t do that. And this is especially a problem for some demographics, like blind readers, who need additional accessibility features to read the book that only a specific ebook reader can provide.

Perhaps the most annoying part about DRM is that many ebook readers, like Adobe, don’t allow you to copy and paste anything from the protected ebook. Suppose you want to copy a long quote? You can’t. You need to manually write it out, or crack the DRM so that you can copy and paste it. This alone is already enough justification to not use DRM, especially in programming books where copying and pasting code from the book is generally much more preferable to typing out each and every single character on your own.


Conclusion


DRM causes massive headaches for your readers, not only because they force you to use a specific ebook reader, but also because these ebook readers often lack a lot of features, or prevent you from using certain features (eg; copy and pasting/printing). Furthermore, DRM is incredibly easy to crack, so having DRM isn’t even an effective method of protecting your books from piracy.

Not only that, but DRM protection hurts researchers and educational institutions that want to use your book, because fair use laws don’t properly apply when it comes to DRM-protected books.

Additionally, it turns out that DRM protection even hurts your net profit, as removing DRM protection can actually cause up to a 10% increase in profits!

If you want to maximize profit, maximize morality, and maximize convenience, then the obvious action is to leave your ebooks DRM-free. There are simply no good reasons for why you should publish a DRM-protected book. Let your readers enjoy your book, with their preferred e-book reader, without all of the extra nonsense and complexity that DRM protection adds. The music industry has already given up on DRM, and the ebook industry is likely soon to follow. Authors should give their readers the best reading experience possible.

Think about all the times you struggled to set up accounts and click on confirmation emails, just to read a single DRM-protected ebook, or when you wanted to copy and paste an excerpt from a book, but couldn’t because of the DRM-protection. Is that really the kind of experience you want to give your readers?

Why You Should Value Function Over Form With Window Managers

Many developers like to spend an excessive amount of time ricing their Linux distros, usually with window managers (WMs) like Awesome, i3wm, and monsterwm. Of course, window managers are often chosen because of their aesthetic, but in many cases, you should value function over form with window managers.

If you’re not familiar with window managers, they essentially split your screen into discrete sections, and assign windows into those sections. You’re free to resize these at any time so that certain windows can occupy more space, and depending on which window manager you choose, you can also stack windows on top of each other, place them in a tabbed view, and switch between multiple different screens. This, combined with the use of workspaces, allows you to conveniently jump back and forth between different sets of windows in an instant.

A screen-capture of i3wm, a popular window manager.

The image above is a bare-basic i3wm setup, with Terminator as the terminal and the standard i3statusbar at the bottom. Aside from modifying the status bar and setting Terminator to use solarized-dark colors, this is an un-riced setup. Typically, ricers will begin the ricing process by using Conky.


The Art of Displaying Tons of Irrelevant Information With Conky


Many ricers love to display an excessive amount of irrelevant information on their desktop as a way to make their screen look fancy and technical. The more scary and overwhelming it looks, the better. Usually, this is done by using Conky, a software whose purpose is to display information on your desktop. At first, this doesn’t sound particularly interesting, but if you’ve ever looked at a riced desktop, then you know first-hand how impressive Conky can make your desktop look.

Conky in action.

I know what you’re thinking — you’re probably thinking, “That’s amazing! I want my desktop to look like that too! Time to close this article and look up a ricing guide“. It’s a trap. Speaking from personal experience, ricing is a massive time-sink. Imagine you’re trying to make a website look fancy by using CSS. Now, swap out the CSS for Lua.

The great thing about making Conky scripts in Lua is that there are no selectors, meaning you need to constantly copy and paste the styling over and over again. For example,  suppose you have yellow text in Times New Roman, font 12. If you want to make ten separate sets of words with that exact styling, you will have to simply copy and paste the exact same styling ten times.

Here’s an example from the Conky setup listed above, which you can find on Conky’s official GitHub page at https://github.com/xyphanajay/conky/blob/master/.conkyrc1

conky.text = [[
${font DejaVu Sans Mono:size=14}${alignc}${time %I:%M:%S}
${font Impact:size=10}${alignc}${time %A, %B %e, %Y}
${font Entopia:size=12}${color orange}CALENDAR ${hr 2}$color
${font DejaVu Sans Mono:size=9}${execpi 1800 DA=`date +%_d`; cal | sed s/"\(^\|[^0-9]\)$DA"'\b'/'\1${color orange}'"$DA"'$color'/}
${font Entopia:bold:size=12}${color red}FILE SYSTEM ${hr 2}${font Noto sans:size=8}
#${offset 4}${color}dev ${alignr}FREE     USED
${offset 4}${color}root (${fs_type /}) ${color yellow}${alignr}${fs_free /} ${fs_used /}
${offset 4}${color yellow}${fs_size /} ${color}${fs_bar 4 /}
${offset 4}${color FFFDE2}home (${fs_type /home}) ${color yellow}${alignr}${fs_free /home/} ${fs_used /home/}
${offset 4}${color yellow}${fs_size /home/} $color${fs_bar 4 /home/}
${offset 4}${color FFFDE2}sda5 (${fs_type /run/media/senpai/6EC832DEC832A3ED/}) ${color yellow}${alignr}${fs_free /run/media/senpai/6EC832DEC832A3ED/} ${fs_used /run/media/senpai/6EC832DEC832A3ED/}
${offset 4}${color yellow}${fs_size /run/media/senpai/6EC832DEC832A3ED/} $color${fs_bar 4 /run/media/senpai/6EC832DEC832A3ED/}
${offset 4}${color FFFDE2}sda6 (${fs_type /run/media/senpai/6EC832DEC832A3ED/}) ${color yellow}${alignr}${fs_free /run/media/senpai/C208F88708F87BAB/} ${fs_used /run/media/senpai/C208F88708F87BAB/}
${offset 4}${color yellow}${fs_size /run/media/senpai/C208F88708F87BAB/} $color${fs_bar 4 /run/media/senpai/C208F88708F87BAB/}
${font Entopia:bold:size=12}${color green}CPU ${hr 2}
${offset 4}${color black}${cpugraph F600AA 5000a0}
${offset 4}${font DejaVu Sans Mono:size=9}${color white}CPU: $cpu% ${color red}${cpubar 6}
${font Entopia:bold:size=12}${color 00FFD0}Network ${hr 2}  
${color black}${downspeedgraph enp8s0 32,80 ff0000 0000ff}${color black}${upspeedgraph enp8s0 32,80 0000ff ff0000}
$color${font DejaVu Sans Mono:size=8}▼ ${downspeed enp8s0}${alignc}${color green} IPv6${alignr}${color}▲ ${upspeed enp8s0}
${color black}${downspeedgraph wlp10s0f0 32,80 ff0000 0000ff}${color black}${upspeedgraph wlp10s0f0 32,80 0000ff ff0000}
$color${font DejaVu Sans Mono:size=8} ▼ ${downspeed wlp10s0f0}${alignc}${color orange} ${wireless_essid wlp10s0f0}${alignr}${color}▲ ${upspeed wlp10s0f0}
${font Entopia:bold:size=12}${color F600AA}Disk I/O ${hr 2}
${alignc}${font}${color white}SSD vs HDD $mpd_name
${color black}${diskiograph /dev/sda 32,80 a0af00 00110f}${diskiograph /dev/sdb 32,80 f0000f 0f0f00}
${font DejaVu Sans Mono:size=8}${color white}   ${diskio /dev/sda}${alignr}${diskio /dev/sdb}
]]

It’s not exactly the prettiest.

But there’s more. With Conky, your desktop doesn’t act like a normal web page, it acts more like a canvas where everything is practically absolutely positioned. Finally, because you’ll likely be too lazy to learn Lua and Conky’s many nuances just for the sake of ricing, you’ll likely resort to to copying and pasting snippets from all over the internet, and with each copy and pasted snippet you add, your configuration becomes even more hacky and unreadable.


If You Value Your Screen Real Estate, Don’t Rice Your Desktop


Ricing your desktop almost always results in massive amounts of frustration, wasted time, and tons of exerted effort. The fun of showing off your setup only lasts for a few brief moments. After that, your riced desktop is basically useless or obstructive, because you’ll either have your Conky setup overlay the desktop, meaning it will be blocked out when you have a window over it, or overlay all of your windows, which means it’s permanently visible.

If you choose to have Conky only on your desktop, it will be 100% covered by whatever window you have open, as a window manager will consume as much desktop space as possible. Since you’ll almost always have tons of terminals or programs running on most of your workspaces, you’ll almost never see your desktop. Once the novelty wears off, your desktop will feel as ordinary as before. If you decide to automate everything, which you likely will do, you’ll have programs automatically opened on all your separate workspaces anyway.

If you choose to have Conky overlay all of your windows, you will quickly realize how annoying it is to have all of that extraneous information plastered over your screen at all times. In most cases, it’s distracting and reduces the amount of visible space on your desktop. If you choose this option, you basically lose anywhere from 20-40% of your screen’s real estate. Assuming that the code you’re working on is limited to 80 characters per line, you won’t be able to split your windows vertically because that would reduce each window’s real estate to only ~30% of the screen, so 80 character lines won’t even fit on your screen.


It might be cool to have something like the Conky animation above on your desktop, but if it’s eating up tons of precious desktop real estate, then it’s not worth it. With an animation like this, you won’t be able to read code, debuggers, or terminal/console logs without having your window in full screen. It goes without saying that there’s no difference between using a window manager and a standard desktop environment like GNOME if you’re only going to view things in full-screen mode..

Ricing your desktop might look pretty, but in my experience, it has always turned out to be a massive waste of time, either because the novelty wore off or because it eventually became annoying. The most efficient way to use a window manager is to use it for what it’s made for — maximizing screen real estate. By using 100% of your screen, leaving no blank spots, you’ll be able to maximize the amount of information you can view at once.

Incidentally, by ricing your desktop, you’ll likely either reduce the amount of information you can view at once, or you’ll end up plastering large amounts of useless information on your desktop, both of which will end up reducing your productivity. Should you decide to use a window manager, remember to value function over form, because at the end of the day, computers are tools, not decorations.

Front-End Color Schemes for the Blind, Colorblind, and Creatively Challenged

Picking colors for a website or GUI can be difficult. However, for blind, colorblind, and creatively challenged people, choosing colors can be nearly impossible. Most people will resort to using vague descriptions, like “Blue is a cool color”, or “Use green to describe liveliness and nature!”.

The fact is, they’re not wrong. But this method of choosing colors is not effective for people who physically cannot see color, or for people who severely lack creativity or artistic ability. For these people, we need a new method; one that can scientifically and objectively determine color combinations that might be visually appealing.

In this article, I will be using pictures. I realize the irony of using pictures when the target audience for this blog post will be people who are unable to see or effectively understand color. However,  I still want to make sure this post is inclusive of non-colorblind people who are looking for a scientific way to choose colors.

In one go, we’ll be covering both of these scenarios at once :

  1. You already have some sort of photo or theme that you are basing the rest of the color scheme around.
  2. .You don’t have any material, meaning you have a white slate. You haven’t chosen a color scheme, and you need help choosing a color.

If You Already Have A Photo or Theme


If you already have a photo, then the first step is to figure out what the dominant color is. This should be fairly simple, but if your photo has multiple varying colors, then you will need to use the average color of the photo.

The average color of the photo is defined by this simple algorithm :

totalRed = 0
totalGreen = 0
totalBlue = 0
numPixels = 0
for every pixel in the image
    totalRed += red in pixel
    totalGreen += green in pixel
    totalBlue += blue in pixel
    numPixels += 1
averageColor = [totalRed / numPixels,
                totalGreen / numPixels,
                totalBlue / numPixels]

Now that you have the average color, we will be basing our entire color scheme around saturation variances of that color.

For example, let’s take a look at cover of my machine learning book, The Mostly Mathless Guide To TensorFlow.

Cover

If you get the average color of this book cover, you’ll find that the average color is a gray-ish blue.

2018-09-14_23-01

Although, in this cover, you can easily tell that the dominant color is blue. When you are easily able to determine the dominant color by a quick glance, there is no need to compute the average color of a photo. However, if you cannot see color, or if the dominant color cannot be easily determined, then an average color algorithm can be very helpful.

The only caveat is that you cannot use the average color if your photo or theme is rainbow or has too many varying colors. For example, here is a rainbow photo.

download

And if we look at the average color, we will get a color like this :

2018-09-14_23-05

In general, if you mix together all of the colors, you will get a murky brown. So it’s no surprise that getting the average color of a rainbow photo will give you an ugly brown-red-ish color.


But What If I Don’t Have a Photo?


If you don’t have a photo, don’t worry! You can determine an ideal color by using the following guidelines from one of Cornell’s art classes, which you can find here.

In general, colors can have both a positive and a negative effect. The most obvious one is red.

Red is often used to evoke feelings of power, strength, energy, and vitality. However, red can also symbolize anger, blood, and violence. Usually red is too aggressive of a color to use as a dominant color, and if it is used as a dominant color, it should be paired with copious amounts of white. Red is often a very good color to use, provided you don’t over-use it.

Blue represents calmness, tranquility, elegance, coolness, and knowledge. On the flip side, it could also represent depression and sadness. Blue is a very safe color to use in your color scheme. In fact, if you are developing software, blue is an excellent color to choose because it disrupts the sleep cycle of the user, causing them to use your product for longer periods of time without getting tired (according to Scientific American).

Yellow is upbeat, cheerful, and optimistic. It’s extremely bright, and will catch anyone’s eye. The downside is that if you use too much yellow, your customers will be annoyed because yellow has very high contrast. Other than that, there are basically no downsides to yellow, and no other wrong ways to misinterpret yellow.

Red, blue, and yellow are the ideal colors, and the remaining colors are mostly niche colors. A study of the top 100 company logos shows that 38% of them have red, 37% have blue, 24% have yellow, and the rest are either black, white, or have negligible amounts of the other colors.

Green represents life, vitality, growth, and money. Especially money, since the dollar bill and dollar sign are green. Green is also associated with toxicity, but realistically, green is a very hard color to misinterpret. Aside from companies that are focused on finance, agriculture, or the environment, there is n’t too much incentive to use green.

The remaining colors are extraordinarily niche.

Pink is for companies that want to focus on women, especially for cosmetics or clothes. Other than that, don’t use pink.

Purple is for games, fantasy, royalty, and dreaming/sleeping. It’s a very niche and rare color, although Yahoo! and Twitch both use purple for their color schemes.

Orange is a friendly color, and suggests accessibility and openness. Use orange when your company is related to oranges, for obvious reasons. However, the negative side is that orange can be associated with ordinariness and being over-accessible.

In general, if you’re unsure of which color to pick, you really can’t go wrong with one of red, blue, or yellow. 


White and Black


Before we dive into discussing about colors that compliment and match each other, we first need to talk about white and black. Use white and black generously with any color you choose.

In general, prefer white over black unless you are going for a night/dark theme. White will go with any color you choose, except yellow. White and yellow is a nightmare color scheme. When using yellow, you must have contrast, otherwise the yellow will blend in with the white, making your website or logo hard to read.

The other forbidden combination is red with black as the dominant color. There are very few scenarios that red and black will look good in. Unless you are specifically going for a gothic, dark, vampiric, scary, or satanic theme, I strongly advise against choosing red and black. This is why all four books of the Twilight vampire series are in black and red.

af9334ce61da3c9abb1257201211060f--twilight-new-moon-twilight-series


Tints and Shades


Let’s first talk about tints and shades of a color. This is the easiest way to guarantee that you won’t mess up a color combination — by using the exact same color, but changing its saturation or lightness. It gives a very comfortable feel, and is the easiest design to do.  This is a principle that follows in line with material design.

Pick literally any color you want, and then use a (usually) darker version of it to add variety to your color scheme, although a lighter version is also acceptable.

Here are some examples :

Blue
2018-09-14_22-10

Red
2018-09-14_22-11

Yellow
2018-09-14_22-12


Complementary Colors


Complementary colors are polar opposites of each other. You use complementary colors when you want to create extremely high contrast. On a web page, avoid using too many complementary colors together, or your users will feel uncomfortable due to the high contrast.

All algorithms can be found online. A complementary color is just two colors that, when combined together, form black or white.

Purple – Complement, Yellow

2018-09-14_22-21

Green – Complement, Red

2018-09-14_22-22

Blue – Complement, Orange

2018-09-14_22-22_1


Analogous Colors


Analogous colors are colors that are next to each other on the color wheel. Analogous colors are very comfortable, and give a feeling of calmness and tranquility. They look beautiful when placed next to each other for this reason.

However, from experience, analogous colors work best when you use light variations of the colors, rather than dark variations. When going for a calm feeling, dark colors give too much expression and contrast, which is generally the opposite of what you want.

To generate a complementary color, simply pick a color, and then the two colors next to it on the color wheel.

Light Red-Orange – Analogous Colors are Light Orange and Pink-Red 

2018-09-14_22-27.png

Light Green – Analogous Colors Are Green-Teal and Green-Yellow

2018-09-14_22-28

Lavender (Blue) – Analogous Colors Are Royal Purple and Bright Teal

2018-09-14_22-29

Bright Yellow – Analogous Colors Are Green-Yellow and Orange

2018-09-14_22-31.png

In general, analogous colors are harmonious, as you can (or maybe can’t) see.


Split Complementary Colors


If you want to use complementary colors, but you feel that the contrast is too strong, use split complementary colors instead. A split complementary color is formed when you take a color and find its complement. Then, instead of choosing the complementary color, you take the two analogous colors for that complementary color instead.

This gives you a similar high-contrast effect as a complementary color, but it is harder to mess up because the colors will have significantly less contrast. On the color wheel, this will usually look like a very thin isosceles triangle.

Bright Yellow – Split Complementary Colors Are Hot Pink and Lavender

2018-09-14_22-35

Green – Split Complementary Colors Are Red-Orange and Hot Pink

2018-09-14_22-36

Royal Blue – Split Complementary Colors Are Mustard Yellow and Orange

2018-09-14_22-37

Red – Split Complementary Colors Are Green and Blue 

2018-09-14_22-39


Triad Colors


Triad colors are what you would get if you took a color wheel and made an equilateral triangle. The colors are perfectly spaced from each other, which gives you a vibrant feel. Unfortunately, it does not give you a harmonious feel, so use one color dominantly, and the other two as supporting colors.

Use the other two colors sparingly for best effect, because these colors will generally be quite close to the split complementary colors. The only difference is that they are more spaced apart, which gives them less contrast.

Blue – Triadic Colors Are Yellow and Red

2018-09-14_22-42.png

Green – Triadic Colors Are Orange and Purple

2018-09-14_22-43

Since triadic colors are equidistantly spaced, there are essentially only two examples. If you pick yellow as your dominant colors, you will get blue and red. If you choose red as the dominant color, you will get yellow and blue.


Tetradic Colors


You get tetradic colors when you pick two colors next to each other on the color wheel, and then pick the two complementary colors of those two colors. You will end up with a rectangle. The effect is that you get high-contrast, but with a variety in colors, as you now have four colors instead of two.

Because of the high contrast, you should generally pick one or two colors (assuming the two colors are NOT complementary colors) and using the other two colors sparingly.

Having a tetradic color scheme is significantly harder and more complex than the other color schemes. As a result, you may find it difficult to get a decent ratio for each color, causing either an ugly or overly high-contrast design.

Purple (Tetradic Colors Are Yellow, Green, and Red)

2018-09-14_22-50

Red (Tetradic Colors Are Green, Blue, and Orange)

2018-09-14_22-51

Orange (Tetradic Colors Are Blue, Purple, and Yellow)

2018-09-14_22-55


Conclusion


We’ve gone over many different color schemes, and the one that works best for you may vary. In general, the easiest color scheme will be analogous colors, split complementary colors, or easiest of all, using tints and shades of a specific color. That’s not to say that the other color palettes are bad — rather, they are exceptionally useful. However, if you are an absolute beginner at picking colors, go for one of the three choices listed above.

If you need something more flexible, the other color palettes are there for you. As with anything involving creativity, the best way to discover what works and what doesn’t is to try it out. Blindly choosing random colors is a poor way to design graphics, but with this approach, it is easy to create multiple designs and have other people critique them.

So what are you waiting for? Get out there and start playing around with your new-found color powers!

Simply Explained : Multithreading

John and Mary both walk into work. Let’s consider both John and Mary to be a “thread”. We’ll define a “thread” to simply be a sequence of consecutive actions. In this case, let’s say that John is a “thread”, and Mary is also a “thread”, because they can both execute actions in parallel. If John is working on a spreadsheet, Mary does not have to wait for John to finish before she can do her own tasks. They are both independent entities.

Now, John loves donuts. Fortunately for John, his company always stocks donuts in the company fridge. For John, his thought process is quite simple, and looks like this :

if John sees at least one donut in the fridge
    then John washes his hands
    then John grabs a donut and eats it

And this is fine and dandy. When John is alone, this course of logic always works. He sees a donut in the fridge, he washes his hands, and he eats it. It always works without fail.

However, one day, Mary walks into the room. And Mary also likes donuts. When John looks into the fridge and sees that there is exactly one donut left, he hurriedly goes to wash his hands. However, when he returns, he finds that the donut is gone! But that shouldn’t have been possible. John had checked that at least one donut existed, and it did, but now it’s suddenly gone.

So what happened? It turns out that Mary had taken the donut in the time that John had spent washing his hands. This is called a race condition, and in a real-world program, your program would either return the wrong result, or just out-right crash.


The Problem with Multithreading


While it may be true that John’s logic always succeeds when he is alone (single-threaded), the same cannot be said when Mary is with him (multithreaded). This is because when objects or resources are shared between multiple threads, multiple different threads are able to modify the same resource at the same time. In this case, the fridge is the object/resource, and both John and Mary are able to modify the contents of the fridge at any time.

This is a huge problem, because now, functions that had been unit tested or proven to work on a single thread no longer work when multithreaded. As shown above, Mary can, at any given time, swoop the last-remaining donut out of the fridge before John gets it. However, if John gets the donut first, then Mary won’t be able to get the donut. There are two different possibilities, based on two different event interleavings. When the ordering of parallel instructions is important to get the right result, you have a race condition.

So how can John prevent Mary from modifying the contents of the fridge until he is done using it? The answer is fairly simple — when John accesses the fridge, he needs to make sure that he is the only one who has control of it until he is done whatever he is doing. There are multiple ways to do this, but the most common is to use something called a “lock” (also called a mutex).

This new multithreaded system with locks has three simple rules :

1. Whoever controls the lock will have sole control over the resource for as long as they possess the lock.
2. A resource should only have one lock.
3. Any thread waiting on a locked object can either throw an exception or wait for it to be unlocked. In which case, it will either be unlocked and passed by some priority order, or a new owner will be randomly chosen.

Let’s observe why these three rules are true.


Rule Number One


“Whoever controls the lock will have sole control over the object for as long as they possess the lock.”

The first rule is true because that is how a lock is defined. But for a more intuitive approach, you can think of the lock as “binding” itself to its owner. As long as the owner of the lock does not relinquish control, the object will forever be locked. This also means that if a thread controlling a locked object gets stuck in an infinite loop, that locked object will be locked forever.

Of course, while you could manually unlock the object, there is no way to determine if an object will be locked forever, because you can’t (in general) determine whether or not a program is stuck in an infinite loop (see Halting problem). You could, however, add a timeout to the lock, although this does have its own set of problems that will not be discussed in this article.


Rule Number Two


“A resource should only have one lock.”

Suppose an object had a specific resource that was guarded by two locks. That means that two different threads can access the resource at the same time. Unfortunately, this is essentially no different than not having a lock at all, because now two threads can access the resource at the same time, if they both grab ownership of different locks. We are back to the exact same problem that we initially started with!

This means that a resource must have one and only one lock, and only one owner for that lock. Having two locks on the same resource makes it less secure, not more.


Rule Number Three


“Any thread waiting on a locked object can either throw an exception or wait for it to be unlocked. In which case, it will either be unlocked and passed by some priority order, or a new owner will be randomly chosen.”

In general, it is bad practice to have your code throw an exception when it attempts to access a locked object. If fairness is important, you can do something like creating a queue for that locked resource, like a wait list. This is so that if three threads wanted to access an object, they would access the object in the order that they called the lock.

For example, the execution order might look like this :


1. Thread 1 calls for the object. It is not locked, so Thread 1 gains control of the lock.
2. Thread 2 calls for the object. It is locked. Thread 2 is put on the queue (wait list)
3. Thread 1 performs some operation using the object.
4. Thread 1 relinquishes control of the lock.
5. Thread 3 calls for the object. It is unlocked at this very exact moment, but because there is a queue for this object, the lock goes to the first element in the queue, which is Thread 2. Thread 3 is now put on the queue.
6. Thread 2 performs some operation using the object.
7. Thread 2 relinquishes control of the lock.
8. Thread 3 automatically gains control of the lock, as Thread 3 is next on the queue.
9. Thread 3 performs some operation using the object.
10. Thread 3 relinquishes control of the lock.


As you can see, when multiple threads want access to a locked resource, they can be accessed in first-come-first-serve order. However, this does not necessarily mean that Thread 2 just has to twiddle its thumb and do nothing. Thread 2 does not have to be blocked while it waits — it can do other computations while it waits for its access to the locked object.

This is important for when the desired operation could take a long time. For example, imagine if Thread 1 wanted access to an object controlling the webcam for your computer. Thread 1 could be using this object for a long time, and if Thread 2 and Thread 3 both sat idly doing nothing, we would experience a severe loss in performance.

Alternatively, when the lock gets freed, it can also be passed to a random thread. By default, most locks are unfair, meaning they get passed to a random thread after being unlocked. The reason for this is that mutexes are much more performant when they don’t have to keep an ordering of which thread goes next, and can simply pick the first non-busy thread.


Conclusion


In this article, you’ve learned that multithreading is difficult because if two threads access a resource at the same time, there’s no guarantee that you will get the correct behavior. Without locks, you’ll have to deal with race conditions, which are incredibly hard to debug.

To fix this problem, you simply have to use a lock, which will prevent other threads from accessing the resource. When a thread is done performing operations with a locked object, it relinquishes the lock, and the next thread gets control of the lock.

In the next Simply Explained post, I’ll be talking about Futures, which is a programming construct used to obtain a value that does not yet exist (for example, because the object you wanted to use to get that value was locked). It allows you to write non-blocking code, because after you create a Future, your thread can do other tasks until the Future makes a callback, telling you that the value now exists.

Happy coding, and enjoy your new-found multithreading powers.

Singletons are Glorified Globals

You’re working on a snippet of code, and out of the blue, you happen to need a class of which you should only have one instance of, and which needs to be referenced by other classes.

Sounds like a job for a singleton! Or is it?


You want to use a singleton to store state


Realistically speaking, if you’re using a singleton solely to store state, you are doing it wrong. What you’ve made isn’t a singleton — what you’ve made is a bunch of glorified globals. Using singletons to store state seems appealing at first, because you want to avoid using a global and every programmer knows that globals are evil. But using a singleton in this case is just abstracting the globals one layer back so that you can feel happy about your code not having globals.

Furthermore, having globals will make your code unpredictable and bug-prone. This becomes exponentially worse as the number of dependencies in your singleton increases. If you are using a singleton because you need its global properties, it’s because you are not taking advantage of dependency injection (DI) / inversion of control (IoC). You should be passing the state around with IoC, not by creating a giant global and passing around the global fields.


Singletons make your code painfully difficult to test and debug


Singletons can’t be easily tested when they are integrated with other classes. For every class that uses a singleton, you will have to manually mock the singleton and have it return the desired test values. On top of this, singletons are notoriously difficult to debug when multi-threading is involved. Because your singleton is a major dependence for several classes, not only is your code tightly coupled, but you will also suffer from hard-to-find multi-threading bugs due to the uncertain nature of globals.


You want to use a singleton to avoid repeating an expensive IO action


Occasionally, you may be tempted to use a singleton to perform an expensive IO action exactly once, and then store the results. An incredibly common example of this is using a singleton for a database connection. But doing so in addition to having multi-threading will cause massive headaches unless your connection is guaranteed to be thread-safe.

In general, database concurrency will not be easy to implement if you are using a singleton for the connection. What you really want is a database connection pool. By caching the connection, you avoid having to repeatedly close and open new connections, which is expensive. As an added bonus, if you use a connection pool, you simply won’t need to use a singleton.


You want to pass data around, but you don’t need to modify the data


You just need a data transfer object. No need for a singleton here. And worse, giving your singleton access to methods that can modify the data makes your singleton a god object. It knows how to do everything, knows all of the implementation details, and is likely coupled to basically everything, violating almost every software development principle.

Worse yet, using a singleton to provide context is a fatal mistake. If a singleton provides context to all the other classes, then that means every class that interacts with the singleton theoretically has access to all the states/contexts in your program.


You are using a singleton to create a logger


Actually, this is really one of the few acceptable use for a singleton. Why? Because a logger does not pass around data to other classes, provides no context, and there is generally minimal coupling between the logger and the classes that require the logger. All the logger needs to know is that given some log request or string, it should output the log as a file or to the console.

As you can see, a logger will provide nothing to classes that require it — there is nothing to grab from the logger. Therefore, it’s impossible to use the logger as a glorified global container. And best of all, loggers are incredibly easy to test due to how simple they are. These properties make loggers an excellent choice for a singleton.

In the future, you’ll probably find a scenario where you’re considering using a singleton for any of the reasons above. But hopefully, you’ll now realize that singletons are not the answer — inversion of control is.