Canny Edge Detection in Python with OpenCV

NOTE: Are you interested in machine learning? You can get a copy of my TensorFlow machine learning book on Amazon by clicking HERE

In my previous tutorial, Color Detection in Python with OpenCV, I discussed how you could filter out parts of an image by color.

While it will work for detecting objects of a particular color, it doesn’t help if you’re trying to find a multi-colored object.

For this tutorial, we will be using this basket of fruits.

fruitbasket

Let’s say we wanted to detect everything except for the table.

We could try and use color, but that would fail very quickly because all of the fruits are different colors. Since canny edge detection doesn’t rely on color, we can use it to solve our problem.

Canny Edge Detection


If I asked you to draw around the basket, you could easily do it.

But hold on, why is it possible for you to differentiate between the basket and the table?

The answer is that the basket has a different image gradient than the table.

To understand what I mean, take a look at the same image in black and white.

fruitbasket_blackwhite

Even without color, you can clearly see the edges of the basket and fruits because the gradients are vastly different at the edges.

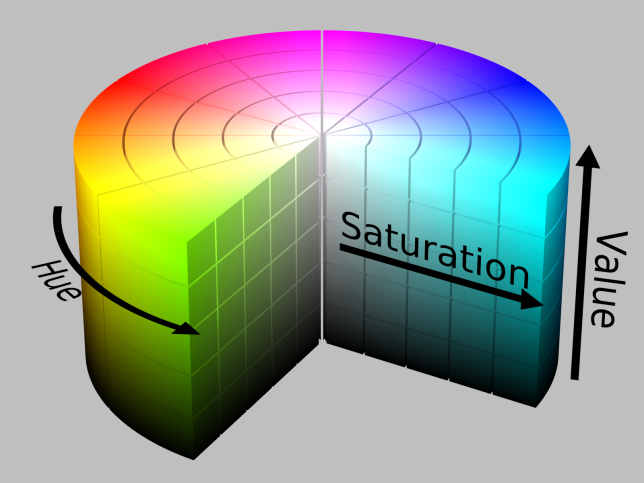
Canny edge detection uses this principle to differentiate between edges. All edges have different gradient intensities than their surroundings. If two adjacent parts of the image have the same gradient intensity, then it wouldn’t be an edge as they would have the same hue and saturation.

Applying Canny Edge Detection


We will be loading the image in as a black and white photo. Images in black and white still have gradients, so it is still possible to differentiate between edges. As a rule of thumb, things tend to be much simpler when they are in black and white.

After we load the image, we need to apply canny edge detection on it.

import cv2
from matplotlib import pyplot as plt

def nothing(x):
    pass


img_noblur = cv2.imread('fruitbasket.jpg', 0)
img = cv2.blur(img_noblur, (7,7))

canny_edge = cv2.Canny(img, 0, 0)

cv2.imshow('image', img)
cv2.imshow('canny_edge', canny_edge)

cv2.createTrackbar('min_value','canny_edge',0,500,nothing)
cv2.createTrackbar('max_value','canny_edge',0,500,nothing)

while(1):
    cv2.imshow('image', img)
    cv2.imshow('canny_edge', canny_edge)
    
    min_value = cv2.getTrackbarPos('min_value', 'canny_edge')
    max_value = cv2.getTrackbarPos('max_value', 'canny_edge')

    canny_edge = cv2.Canny(img, min_value, max_value)
    
    k = cv2.waitKey(37)
    if k == 27:
        break

There are four arguments for cv2.Canny. The first one is your input image. The second and third are the min and max values for the gradient intensity difference to be considered an edge. The fourth is an optional argument which we have left blank.

If the fourth argument is set to true, then it uses a slower and more accurate edge detection algorithm. But by default, it is false and will calculate gradient intensity by adding up the absolute values of the gradient’s X and Y components.

Before canny edge detection can be applied, it is usually a good idea to apply a blur to the image so that random noise doesn’t get detected as an edge.

You can adjust the track bar however you’d like to edit the min and max values for the canny edge detection. I found that a min value of 36 and a max value of 53 worked well.

results

It also depends on how much you are blurring the image. The more you blur the image, the less noise there is. However, blurrier image have less accurate edges.

On the flip side, not enough blurring causes random noise to be detected. In the end, the level of blur is a trade-off between noise and edge accuracy.

Conclusion

Canny edge detection is only one of the many ways to do edge detection. There are hundreds of different edge detection methods, including Sobel, Roberts, SUSAN, Prewitt, and Deriche.

All edge detection methods have pros and cons, and Canny is just one of them. In general, canny edge detection tends to yield good results in most scenarios, so it is well-suited for general use. However, other edge detectors may be better depending on the situation.

If Canny isn’t working effectively for you, try a different solution. The best way to know if something works well is to test it out for yourself.

Advertisement

Speak My Language: i18n and l10n in Django

A user of your app emails you and tells you that they would love if the greeting screen were in Spanish.

def greeting():
  print("Hello!")

You think to yourself, “No problem! I’ll just use a dictionary!”

dictionary = {
  "Hello!":"Hola!",
}

def greeting():
  print(dictionary.get("Hello")

Now, after running greeting(), you get “Hola!”. Perfect! You’re done localizing it into Spanish.

Afterwards, Mr. Foobar requests that you localize it into French as well.

Except, you can’t, because dictionaries are one to one. You can’t add a new key value pair of “Hello!” and “Bonjour!”.

But what you could do is add tons of dictionaries, but then that runs into another problem :

It’s difficult to edit, and your translators are lost and confused because they aren’t programmers.

You could do it with a set of parallel arrays, and have something like:

english = ["Hello!"]
spanish = ["Hola!"]
french = ["Bonjour!"]

But what would happen if you didn’t have one word, but a thousand words, in 10 different languages. What then? Ten parallel arrays with a thousand words in each array? (ignoring the fact that a word in English might be two words in Spanish) And what if the localization isn’t fully complete? Would you just insert blank strings into the array to make the array indexes line up?

There are simply too many issues with parallel arrays, and the amount of vertical space you would need to have a set parallel arrays that large would be bad enough to summon Cthulhu from the depths of R’lyeh.

Most importantly, no sane translator is going to waste time counting the indexes to make sure they’re adding the word into the right index.

We need a solution that is easy to understand for translators, easy to maintain, and doesn’t require writing lots of code.

So what’s the solution proposed by Django?

Django’s Solution

Django uses ugettext to do i18n, or internationalization. Internationalization is the act of making all the strings in your code translatable into a different language.

Commonly, you will see ugettext imported like this:

from django.utils.translation import ugettext as _

For reasons that may forever be unknown to me, ugettext is always aliased as an underscore as common convention.

Conventions aside, let’s create a dummy view in Django to show how ugettext works.

from django.shortcuts import render
from django.http import HttpResponse
from django.utils.translation import ugettext as _

def testView(request):
  output = _('Hello!')
  return HttpResponse(output)

To use ugettext, you simply need to call ugettext(‘STRING_HERE’), or _(“STRING_HERE”) since an underscore is aliased to ugettext.

Next, you will need to create a folder called “locale” in the base directory of your project. Then, edit your settings.py and add:

LOCALE_PATHS = (os.path.join(BASE_DIR, "locale"))
#Gives you BASE_DIR/locale

This tells Python that our locale path should be inside the “locale” folder.

Now comes the fun part. Run django-admin makemessages -l es. This will create a .po file called “django.po” in BASE_DIR/locale/sp/LC_MESSAGES, where “es” is español, or Spanish.

The .po extension stands for Portable Object, and it is used to hold all of the phrases in the original language and the translated language.

If you open “django.po”, you will see the following:

#, python-format
msgid "Hello!"
msgstr ""

Now, edit the msgstr so that it reads as follows:

#, python-format
msgid "Hello!"
msgstr "Hola!"

We are adding a new translation for the Spanish version of “Hello!”.

Now, we need to compile our .po file to a .mo file, which Django can use to process our translations.

Run django-admin compilemessages -l es

Once the .mo file is created, Django will be able to search for the input word or phrase, and output the translated word or phrase. After this step is done, the localization for Spanish is complete!

But Why Isn’t My Text Translated?

If you ran the code, you may have noticed that the text didn’t translate. And you’re correct.

Why should it?

Localization is intended to provide different languages to specific users. Django differentiates between Spanish and American users by your browser’s locale. Django will only translate the page if your locale is “es”. If you live in the United States, your locale is most likely “en” or “en-us”.

If you want to test your code, simply change your locale to “es”, and the translation will work appropriately.

Conclusion

Django’s solution is essentially a gigantic dictionary split into multiple files, with each language being represented by a .po file. A huge benefit of this is that the code is partially decoupled from the translation. The .po file is generated from the code, but translators are unlikely to crash the website by editing the .po file, as they only have to insert their translation into the msgstr part.

As a result, the programmers are happy, as the code is separate from the translations, and the translators are happy, as the translations are separate from the code. It’s easy for both parties to access, meaning translators don’t have to fidget with the code, and programmers don’t have to fidget with long bundles of translated phrases.

Django’s solution is a perfect win-win for everyone.

Why Keyword Arguments in Python are Useful

In Python, there are two types of arguments : Positional arguments and keyword arguments.

A positional argument is a normal argument in Python. You pass in some data as input, and that becomes your positional argument.

def foo(posArg):
  print(posArg)

There’s nothing unique or inherently special about positional arguments, but let’s say you have a function that evaluates your pet. Is your pet happy? Is your pet healthy? Is your pet playful?

def evaluatePet(isHappy, isHealthy, isPlayful):
  if(isHappy):
    print('Your pet is happy!')
  
  if(isHealthy):
    print('Your pet is healthy!')
 
  if(isPlayful):
    print('Your pet is playful!')

That’s fine and dandy, but what does it look like when we call the function?

 
evaluatePet(True, True, False)

We get the output :

Your pet is happy!
Your pet is healthy!

The result is correct, but the function call is absolutely unreadable.
A reader who has never read the documentation for evaluatePet will have a difficult time understanding what it does. From a quick glance, it takes three booleans. But what do those booleans describe? Whether it’s alive? Whether it’s a ghost? Whether it’s a flying ten thousand feet tall purple dinosaur?

The solution to this issue of readability is to avoid using a positional argument, and instead use a keyword argument.

A keyword argument is an argument that follows a positional argument, and allows the user to pass in arguments by explicitly stating the argument’s name, and then assigning a value to it.

In other words, you can call evaluatePet(True, True, False) in any of the following ways, without changing anything in the evalulatePet function.

#Explicitly calling the names and
#assigning all three of the arguments
evaluatePet(isHappy = True, isHealthy = True, isPlayful = False)

#Switching the order of the arguments.
#Since the arguments are named, 
#the order can be anything you like.
evaluatePet(isHealthy = True, isPlayful = False, isHappy = True)

#You can use positional arguments AND keyword arguments
#at the same time, as long as the keyword arguments
#are AFTER the positional arguments.
evaluatePet(True, isHealthy = True, isPlayful = False)

#Keyword arguments can ALWAYS 
#be switched around in any order
evaluatePet(True, isPlayful = False, isHealthy = True)

However, there are some things that you can’t do.

#Putting keyword argument before
#positional argument is illegal
#Will error, 
#"Positional argument follows keyword argument."
evaluatePet(isPlayful = False, isHealthy = True, True,) 

#Also will error for the same reason.
evaluatePet(isPlayful = False, True, isHealthy = True) 

You can see that with keyword arguments, the arguments are explicitly assigned. There is no confusion. The reader can simply look at a line like :

evaluatePet(isHealthy = True, isPlayful = False, isHappy = True)

And they will automtaically know, “Oh. This function takes in three booleans which are, isHealthy, isPlayful, and isHappy.”

It would be a huge understatement to say that this is the only thing that keyword arguments can do.

You can also load in defaults.

def evaluatePet(isHappy = False, isHealthy = False, isPlayful = False):
  if(isHappy):
    print('Your pet is happy!')
  
  if(isHealthy):
    print('Your pet is healthy!')
 
  if(isPlayful):
    print('Your pet is playful!')

Now, all three arguments become optional, and become automatically assigned to False if that specific argument has not been assigned.

#All three are automatically set to False, 
#so nothing is printed.
evalulatePet()

#You can set just one to True, 
#and the rest will automatically be False.
evaluatePet(isHappy = True)
evaluatePet(True)

Convenient, isn’t it? You can give your function a ton of default values, and then allow the user to change any defaults they don’t like, without requiring them to rewrite all the default values.

Underneath all of this magic, Python created a dictionary with a key value pair, where the keys are the argument names, and the values are the values you assign to those argument names.

If you want to prove this fact, you can use a true keyword argument by putting a double asterisk before an argument.

def foo(**kwargs):
  print(str(kwargs))

foo(bar = "henry", baz = "dang", foobar = "prg")

Output :

{'bar': 'henry', 'foobar': 'prg', 'baz' : 'dang'

In other words, Python has been converting evaluatePet’s arguments into a dictionary.

Naturally, Python wants the group of keyword arguments together, because it is cheaper to lump all the arguments together if they are all within one specific range (and not broken up between multiple ranges). In addition to this, Python can’t accept a positional argument after a keyword argument because it is impossible to determine which argument you are referring to. Are you referring to the first argument? Or the argument after the keyword argument?

These two reasons combined are why you can’t put in positional arguments, and then keyword arguments, and then another positional argument.

You might argue that Python should be able to do this :

evaluatePet(isHappy = False, isHealthy = False, False)

Since there are only three arguments, and two of them are keyword arguments, the third argument must be “isPlayful”.

However, Python’s philosophy is
“Special cases aren’t special enough to break the rules.”

So instead of Python automatically iterating over your arguments to figure out which argument hasn’t been assigned yet (you shouldn’t do this anyway since iterating over a list is expensive), Python simply says, “This is a special case. Follow the rules and deal with it.”

So while Python could potentially have allowed this special case to work, their mantra of sticking strongly to rules prevents you from doing so.

In a nutshell, keyword arguments are simply augments to Python’s core philosophy that “readability counts”. Without keyword arguments, readers must examine the documentation to understand what the arguments mean, especially if there are many arguments. The use of defaults also makes functions shorter if the user is unlikely to modify the defaults.

Shorter argument lists? Argument defaults? Understandable parameters? That’s elegant.

How URL Routing in Django Works

A URL is a uniform resource locator. It contains the address that links to a resource such as an HTML page.

For example, “https://henrydangprg.com” is a URL, that links to the HTML page that contains this website. A single website, like this, can have many other URL’s formed by adding a backslash (“/”) after the domain name.

If you wanted to access the about page on this website, you would add “/about/” to the end of the home page’s URL. It can be visualized like a tree.

You start with the base website, and you have other possible URL’s accessible by adding a backslash and some word.

  • https://henrydangprg.com/
    • about/
    • contact/
    • infinitely-many-other-possibilities/
      • which-can-contain-other-links/
        • containing-potentially-even-more-links/

In theory, you can have something like :

https://henrydangprg.com/foo/bar/foobar/foobarbar/foofoo-ad-infinitum/

How Does It Work in Django?

In Django, the premise is exactly the same. Inside each project is a urls.py file.

You’ll see something along the lines of this :

from django.conf.urls import url
from django.contrib import admin

urlpatterns = [
  url(r'^admin/', admin.site.urls),
]

Here, you can see that Django handles the URL routing with regular expressions. The ‘r’ before a string indicates that the following string is raw input. This means that Python will not convert things like ‘\n’ into a new line, and will instead process it as is.

You can play around with the urlpatterns list, and add new url’s to test that it works.

For example, if we change it to :

urlpatterns = [
  url(r'^admin/', admin.site.urls),
  url(r'^foobar/', admin.site.urls),
]

Then foobar will become a possible extension to your website’s URL. Assuming you’re using localhost and a port of 8000, it would be 127.0.0.1:8000/foobar/ to access your new URL.

If you want to go down two layers deep, like 127.0.0.1:8000/foobar/foo, you should create a new app.

Let’s make a new app called “foobar”.

django-admin startapp foobar

Modify the urlpatterns list inside your project’s urls.py file. We are now going to add foobar’s urls.py file into the project’s urls.py.

from django.conf.urls import include, url
from django.contrib import admin

urlpatterns = [
  url(r'^foobar/', include('foobar.urls')),
  url(r'^admin/', admin.site.urls),
]

Essentially, any time we visit 127.0.0.1:8000/foobar/, Django will see that we want to access “foobar”, and will check foobar’s urls.py for the next portion of the URL.

Now, we have to add add URLs into foobar. Go into the foobar directory and modify urls.py.

from django.conf.urls import url
from django.contrib import admin

from . import views

urlpatterns = [
  url(r'^$/', admin.site.urls),
  url(r'^foo/', admin.site.urls),
]

I don’t suggest you actually make every URL link to admin.site.urls, but for the sake of simplicity, we will stick to using that.

The ‘^$’ simply indicates that if there is nothing, then load the admin page. In this case, it would be 127.0.0.1:8000/foobar/ because there is nothing after “foobar/”, which is what our project’s urls.py looked up until.

We also added “foo” to our urlpatterns, which means we can now visit 127.0.0.1:8000/foobar/foo, allowing us to add extensions to our URL.

You can add virtually any URL you want, and as many levels of URLS as needed. You don’t even have to add new apps for each new extension. However, you will have to write a lot of duplicated code if you do that.


#With new apps 

urlpatterns = [
  url(r'^foobar/', include('foobar.urls')),
  url(r'^admin/', admin.site.urls),
]

#foobar.urls
urlpatterns = [
  url(r'^$/', admin.site.urls),
  url(r'^foo/', admin.site.urls),
]

#Without new apps, anti-DRY

urlpatterns = [
  url(r'^foobar/$', admin.site.urls),
  url(r'^foobar/foo$', admin.site.urls)
  url(r'^admin/$', admin.site.urls),
]

You can see that you would have to write out the full URL each time. If you had 100 URL’s, all 100 would have to be crammed into this single urlpatterns list, and if it goes 10 layers deep, you would have to write it all out each time.

Conclusion

URL routing with Django is absurdly easy, provided that you know a little bit of regex. However, if you are struggling with regular expressions, you can click here for an interactive regular expressions tester.
Best of luck with learning Django, and happy coding!


Null Island – The Most Famous Island that Doesn’t Exist

It’s been a long and tiresome week of work, and you want a vacation.

You search online for some decent vacation spots.

Hawaii? Nah. Canada? Already been there.

But hold on, something catches your eye. Null Island? Thousands of visitors? And look at that population density! All those posts from (0,0)?

And so you set out on an arduous and dangerous journey to Null Island, only to find this.

Null-island-buoy
Photo from Wikipedia

Yep. Null Island, the most popular tiny island you’ve found in your life, doesn’t exist.

What’s Going on Here?

Null Island, located with the geographic coordinates (0,0), is a byproduct formed by bad programming.

How did it happen?

Some developers who were creating a GPS system decided that, if a person’s coordinates couldn’t be found, that instead of setting them (Null, Null), they were instead set to (0,0).

In psuedocode, it went down something like this :

if user's x coordinate is Null
  set user's x coordinate to 0

if user's y coordinate is Null
  set user's y coordinate to 0

Not only is this kind of code an anti-pattern, but for something such as position tracking, this can have serious consequences.

For example, in Wisconsin, many voters were in locations that did not have registered coordinates. However, in order to vote, they needed to use a new geocoding system that tied their house address to a geographical coordinate.

Unfortunately, the Wisconsin voters were given a geographical coordinate of (0,0), or Null Island. For a population of nearly 6 million, the problem was quickly discovered and fixed, but it is yet another example of how bad programming can wreck havoc.

To prevent mistakes like these, ask yourself if what you’re doing makes sense in a different context.

Here are some similar scenarios, using the same logic that caused the Null Island issue.

if user's phone number is Null
  set user's phone number to 000-000-0000

if user's pin number is Null
  set user's pin number to 0000

if user's credit card number is Null
  set user's credit card number to
    0000 0000 0000 0000

In scenarios where the 0 is significant, you cannot replace null with zero. If your wallet is null, it means you don’t have any money. Your balance is 0. If your friend count is null, it means you have no friends, so your friend count is 0.

However, if the zero matters, such as in a phone number, you can’t set the user’s phone number to 000-000-0000. Similarly, if you have an expensive watch, and the price is null because it’s not for sale, that doesn’t mean your watch costs $0.00. That would imply that you’re giving it away for free.

Conclusion

Null Island is a silly coding mistake that carries significant consequences, even today.

That’s not to say that every single mistake you make will effect an entire state’s voter population, but it can happen.

If you want to avoid creating the next equivalent of Null Island, leave your user’s input as is instead of attempting to change it. Null means null. Leave it as null.

Five Great Practices for Safer Code

You’re sitting at your desk, glaring at your monitor, but it glares back at you with equal determination.

Every change you make introduces new bugs, and fixing a bug causes another bug to pop up.

You don’t understand why things are randomly breaking, and the lines of code just increase every day.

However, by coding in a rigorous and specific fashion, you can prevent many of these issues simply by being slightly paranoid. This paranoia can save you hours in the future, just by dedicating a few extra seconds to include some additional safeguards.

So without further ado, let’s jump right into the top five tips for safer code.

1. Stop Accepting Garbage Input


The common phrase “Garbage in, Garbage out” is one that rings strongly with many programmers. The fact is, if you accept garbage input, you’re going to pass out garbage output. If your code has any modularity at all, then something like this will likely happen :

def foo(input):
  do_stuff

def bar(input):
  do_other_stuff

garbage_input = 'Hi. I'm garbage input.'

some_variable = foo(bar(garbage_input))


As you call foo and bar and other functions, all of which depended on garbage_input, you find that everything has turned into garbage. As a result, functions will start throwing errors a few dozen passes down the line, and things will become very difficult to debug.

Another common mistake is attempting to correct the user’s input in potentially ambiguous cases, which leads to the second tip.

2. Don’t Try to Correct Garbage Input


Let’s take an example scenario :

Imagine you had a box that exported values from 0 to 1 on a display, depending on the number the user passed in.

One day, you suddenly get a value of 1.01, a value slightly higher than the maximum. Now, this should raise a red flag for most programmers. However, some programmers resort to doing the following :

def calculateValue(temperature):
  do_calculations

def getBoxValue(temperature):
  if calculateValue(temperature) > 1 :
    return 1
  elif calculateValue(temperature) < 0 :
    return 0
  else:
    return calculateValue(temperature)

The technique shown above is known as clamping, which is basically restricting the value to a certain range. In this case, it is clamped to 0 and 1. However, the problem with the above example is that it is now impossible to debug the code.

If the user passed in bad input, you would get a clamped answer, instead of an error, and if the calculateValue function was buggy, you would never know. It could be slightly inflating the value, and you would still never know, because the values would be clamped.

As an exaggerated example, if calculateValue returned 900,000,000, all you would see is “1”. Instead of embracing and fixing bugs, this tactic throws them under the carpet in the hopes that no one will notice.

A better solution would be :

def calculateValue(temperature):
  do_calculations

def getBoxValue(temperature):
  if(calculateValue(temperature) > 1
       or calculateValue(temperature) < 0):
    raise ValueError('Output is greater than 1 or less than 0.')
  else:
    return calculateValue(temperature)

If your code is going to fail, then fail fast and fix it fast. Don’t try to polish garbage. Polished garbage is still garbage.

3. Stop Double Checking Boolean Values in If Statements


Many programmers already adhere to this principle, but some do not.

Since Python prevents the bug caused by double checking a boolean value, I will be using Java, as the bug can only happen in languages where assignment is possible in if statements.

In a nutshell, if you do this :

boolean someBoolean = true;

if(someBoolean == true) {
  System.out.println('Boolean is true!');
} else {
  System.out.println('Boolean is false!');
}

In this case,

if(someBoolean == true)

Is exactly equivalent to :

if(someBoolean)

Aside from being redundant and taking up extra characters, this practice can cause horrible bugs, as very few programmers will bother to glance twice at an if statement that checks for true/false.

Take a look at the following example.

boolean someBoolean = (1 + 1 == 3);

if(someBoolean = true) {
  System.out.println('1 + 1 equals 3!');
} else {
  System.out.println('1 + 1 is not equal to 3!');
}

At first glance, you would expect it to print out “1 + 1 is not equal to 3!”. However, on closer inspection, we see that it prints out “1 + 1 equals 3!” due to a very silly but possible mistake.

By writing,

if(someBoolean = true)


The programmer had accidentally set someBoolean to true instead of comparing someBoolean to true, causing the wrong output.

In languages such as Python, assignment in an if statement will not work. Guido van Rossum explicitly made it a syntax error due to the prevalence of programmers accidentally causing assignments in if statements instead of comparisons.

4. Put Immutable Objects First In Equality Checks


This is a nifty trick that piggy backs off the previous tip. If you’ve ever done defensive programming, then you have most likely seen this before.

Instead of writing :

if(obj == null) {
  //stuff happens
}

Flip the order such that null is first.

if(null == obj) {
  //stuff happens
}

Null is immutable, meaning you can’t assign null to the object. If you try to set null to obj, Java will throw an error.

As a result, you can prevent the silly mistake of accidentally causing unintentional assignment during equality checks. Naturally, if you set obj to null, the compiler will throw an error because it’s checking a null object when it expects a boolean.

However, if you are passing around methods inside the if statement, it can become dangerous, particularly methods that will return a boolean type. The problem is doubly bad if you have overloaded methods.

The following example illustrates this point :

final int CONSTANT_NUM = 5;

public boolean foo(int x){
  return x%2 != 0;
}

public boolean foo(boolean x){
  return !x;
}

public void compareVals(int x){
  if(foo(x = CONSTANT_NUM)){
    //insert magic here
  }
}

In this example, the user expects foo to be passed in a boolean of whether or not x is equal to a constant number, 5.

However, instead of comparing the two values, x is set to 5. The expected value if the comparison was done correctly would be false, but if x is set to CONSTANT_NUM, then the value will end up being true instead.

5. Leave Uninitialized Variables Uninitialized


It doesn’t matter what language you use, always leave your uninitialized variables as null, None, nil, or whatever your language’s equivalent is.

The only exception to this rule is booleans, which should almost always be set to false when initialized. The exception is for booleans with names such as keepRunning, which you will want to set initially to true.

In Java’s case,

int x;
String y;
boolean z = false;

In particular, for Python especially, if you have a list, make sure that you do not set it to an empty list.

The same also applies to strings.

Do this :

some_string = None
list = None

Not this :

some_string = ''
list = []

There is a world of a difference between a null/None/nil list, and an empty list, and a world of a difference between a null/None/nil string, and an empty string.

An empty value means that the object was assigned an empty value on purpose, and was initialized.

A null value means that the object doesn’t have a value, because it has not been initialized.

In addition, it is good to have null errors caused by uninitialized objects.

It is unpleasant to say the least when an uninitialized string is set to “” and is prematurely passed into a function without being assigned a non-empty value.

As usual, garbage input will give you garbage output.

Conclusion


These five tips are not a magical silver bullet that will prevent you from making any bugs at all in the future. Even if you follow these five tips, you won’t suddenly have exponentially better code.

Good programming style, proper documentation, and following common conventions for your programming language come first. These little tricks will only marginally decrease your bug count. However, they also only take about an extra few seconds of your time, so the overhead is negligible.

Sacrificing a few seconds of your time for slightly safer code is a trade most people would take any day, especially if it can increase production speed and prevent silly mistakes.

Bogosort : Moving At The Pace of a Random Snail

Bogosort is a sorting algorithm, much like quick sort, and merge sort, with a twist.
It has an average case performance of O((n+1)!).

Bogosort is known by many other names, including stupid sort, monkey sort, and permutation sort.

Knowing this critical information, let’s dive into the meat of this sorting algorithm.

How Does It Work?


Bogosort works by taking an input list, and checking if it is in order. If it is, then we are done, and the list is returned. This means that Bogosort has a best case performance of O(n).

If the list isn’t in order, then we will shuffle the list until we get a list that is sorted. Unfortunately, since the list will be shuffled randomly, Bogosort technically has a worst case performance of O(∞).


Implementation


Bogosort’s implementation is short and concise.

import random

def Bogosort(list):
    while not isSorted(list):
        random.shuffle(list)
    return list

def isSorted(list):
    if(len(list) &amp;amp;lt;= 1):
        return True

    if(list[1] &amp;amp;gt;= list[0]):
        return isSorted(list[1:])
    else:
        return False

Simple and crisp. Let’s try it on some inputs.
Note that I used Python’s time module to print out the time, which is quick and dirty, but it does the job.

Bogosort([5,4,3,2,1])
Time = 0.000202894210815

Okay. Now let’s try it again on an input size of 10.

Bogosort([10,9,8,7,6,5,4,3,2,1])
52.8398268223

Since it is completely randomized, running this will give different times each time it is run, but the ballpark figure will at least be somewhat similar.

Normally, I’d try on a larger input size, but since the growth rate is going to be exponential, an input size of 11 will cause a time that is much longer than when an input size of 10 is used.

In fact, in our example, running on an input size of 10 took over 260,000 times longer than when run on an input size of 5.

However, since the numbers are random, it is impossible to determine exactly how much longer it will take , but it should be somewhere around that range.

Conclusion


If you are looking for a horrendously slow sorting algorithm for any reason, Bogosort is the perfect candidate. It works by randomly shuffling the list until it gets a sorted list, which means that its average performance is going to be O((n+1)!).

Of course, Bogosort should not be taken as a serious sorting algorithm, and is intended to be used as a comparison to other sorting algorithms like quick sort and merge sort.

Unless your goal is to create slow code, stay far far away from this monstrosity.


Why You Shouldn’t Validate Emails with Regex

Foo, a programmer working at FooBar Inc., is happily working on a registration form, when he think to himself,

“Hmm. I should probably check if the email is valid.”

Somewhere along the line, Foo connect the words “email” and “valid” with “regular expressions”.

But as the great Jamie Zawinski once stated,

Some people, when confronted with a problem, think “I know, I’ll use regular expressions.” Now they have two problems.


Implementing Regular Expressions to Validate Email Addresses


Now, for the sake of demonstration, let’s look into the thought processes of Foo.

First, Foo thinks, “Well, what makes an email address valid?”

He quickly scribbles down a list.

  1. Email must contain an “@” symbol.
  2. Email must contain a “.” symbol.
  3. Email must not contain spaces.
  4. Email can have the character sets [a-zA-z]
  5. Email can have the number sets [0-9]

Foo also knows that the order must always go as follows :

  1. Word
  2. “@” symbol
  3. “.” symbol
  4. Domain Name

Okay. Seems simple enough, right?

Foo writes the following regex :

^[a-zA-Z0-9]+@[a-zA-Z0-9]+\.[a-zA-Z0-9]+

And it works flawlessly! At first, anyway.
It turns out that a regex statement like this won’t account for emails like “henry.dang@henrydangprg.com” or “henry-dang@henrydangprg.com”

The solution? As long as it’s [az-A-Z0-9._], it should be fine, up until the “@” symbol.

^[a-zA-Z0-9.-]+@[a-zA-Z0-9]+\.[a-zA-Z0-9]+

So far so good! Looks like everything’s working. But hold on, your friend tries to sign up with his email, “henry.dang@henry.dang.prg.com”, which is an absolutely valid email. Now you have to compensate for multiple periods after the “@” symbol!

But even after Foo fixes that, he realizes that his input could be infinitely large if someone strung together infinite periods! (EX : henry.dang@henry.henry.henry.henry.henry.henry.henry… and so on)

But wait! There’s more! The user could have a plus sign in his email, but not in the domain. And wait! What about foreign characters? And apostrophes? And all those other wild characters that hardly anyone would use in an email, but would still be valid if they really wanted to use it?

The fact of the matter is that Foo will most likely be unable to account for every single possible letter and combination. There are simply too many, and attempting to match all of them will simply bring in angry customers who have some esoteric symbol in their email that you failed to account for.


So What’s the Solution?


The solution is simple. Don’t use regex. It is not the right tool for the job. All you need to do is check if the user has an “@” and a “.” in their email. Anything else is extraneous and will lead to some user emailing you about how they can’t register with their email.

There is no point in attempting to check the infinite possibilities for an email. Send the user a confirmation email. If their email is valid, they will receive an email. If not, then their email was invalid, and they should change it.

For the stubborn or curious user, there is a solution available here. Clocking in at a whopping 6424 characters, this monstrous and unreadable regular expression is the last thing you want to use in your code.

Color Detection in Python with OpenCV

NOTE: Are you interested in machine learning? You can get a copy of my TensorFlow machine learning book on Amazon by clicking HERE

Image processing may seem like a daunting and scary task, but it’s actually not as terrible as some people make it out to be. In this tutorial, we will be doing basic color detection in OpenCV version 2.4.13. with Python 3.5. Note that you will also need to install NumPy to run the code in this article.

How Does Color Work on a Computer?


On a computer, color can be represented in many formats. However, in this tutorial, we will be strictly concerned with only BGR (Blue, Green, Red) and HSV (Hue Saturation Value).

With BGR, a pixel is represented by 3 parameters, blue, green, and red. Each parameter usually has a value from 0 – 255. For example, a pure blue pixel on your computer screen would have a B value of 255, a G value of 0, and a R value of 0. Your computer would read this and say, “Ah. This pixel is 255 parts blue, 0 parts green, and 0 parts red.”

With HSV, a pixel is also represented by 3 parameters, but it is instead Hue, Saturation and Value.

Unlike BGR, HSV does not use the primary color to represent a pixel. Instead, it uses hue, which is the color or shade of the pixel.

The saturation is the intensity of the color. A saturation of 0 is white, and a saturation of 255 is maximum intensity. Another way to think about it is to imagine saturation as the colorfulness of a certain pixel. Value is the simplest of the three, as it is just how bright or dark the color is.

HSV can be imagined like a three dimensional cylinder, as seen in the picture below.

hsv_color_solid_cylinder_alpha_lowgamma
Photo taken from Wikipedia’s HSL and HSV article.

Converting BGR to HSV


Since we will be using HSV, you will need an BGR to HSV to converter because OpenCV uses a different HSV scale from popular image editors like Gimp.

First, copy the following code into your favorite text editor and save it as converter.py. The lower and upper bound part will be explained later.

import sys
import numpy as np
import cv2

blue = sys.argv[1]
green = sys.argv[2]
red = sys.argv[3]  

color = np.uint8([[[blue, green, red]]])
hsv_color = cv2.cvtColor(color, cv2.COLOR_BGR2HSV)

hue = hsv_color[0][0][0]

print("Lower bound is :"),
print("[" + str(hue-10) + ", 100, 100]\n")

print("Upper bound is :"),
print("[" + str(hue + 10) + ", 255, 255]")

Now, we need an image to do color detection on. Download the image below and place it in the same directory as converter.py

circles

We have an image, and an BGR to HSV converter. That’s all we need to get started, so let’s jump into the actual image processing.

Let’s Get to the Code Already!


Fire up your favorite text editor and save a new file called “image.py” in the same directory as the circles.png file.

First, we need to grab our imports and load the image in OpenCV.

import cv2
import numpy as np

img = cv2.imread('circles.png', 1)

The 1 means we want the image in BGR, and not in grayscale.

As stated before, we will be using HSV instead of BGR, so we need to convert our BGR image to a HSV image with the following line.

hsv = cv2.cvtColor(img, cv2.COLOR_BGR2HSV)

Great! Now that the picture is in HSV, we need something called a “lower range” and an “upper range” for the hue that we are searching for. The lower range is the minimum shade of red that will be detected, and the upper range is the maximum shade of red that will be detected. In our case, let’s search for the red circle at the top left. To do so, we will need to obtain the RGB numbers for the red circle.

I personally prefer Gimp, so I will be using that for the color picker feature. Simply use the color picker and click on the red circle, and you will have copied it. Now, click on the red shade that you copied. (see photo below)

color-picker

After clicking on that, you should see the following screen :

color-bgr.png

We can see that red equals 237, green equals 28, and blue equals 36. We will be using these numbers with the converter to automatically generate the respective lower range and upper range HSV values for OpenCV. (Note that this method is inaccurate when the color is less pure or murky)

Remember that the HSV values shown in the photo are different from the ones in OpenCV. The scaling is different, so you can not use the values Gimp gives you for OpenCV.

Open up your terminal or command line and cd into the directory with the converter.py file and run the following :


python3 converter.py 36 28 237

Note that the order is in BGR, not RGB. After you run the script, it should output that the lower range = [169, 100, 100] and the upper range = [189, 255, 255].

We will now use NumPy to create arrays to hold our lower and upper range.

lower_range = np.array([169, 100, 100], dtype=np.uint8)
upper_range = np.array([189, 255, 255], dtype=np.uint8)

The “dtype = np.uint8” simply means that it will have the data type an 8 bit integer, which makes sense, because the max possible value for the hue, saturation, and value is 2^8 – 1.

Finally, with the lower range and the upper range found, we can create a mask for our image.

mask = cv2.inRange(hsv, lower_range, upper_range)

cv2.imshow('mask',mask)
cv2.imshow('image', img)

while(1):
  k = cv2.waitKey(0)
  if(k == 27):
    break

cv2.destroyAllWindows()

A mask is simply a specific part of the image. In this case, we are checking through the hsv image, and checking for colors that are between the lower-range and upper-range. The areas that match will be set to the mask variable.

After that, we can display both the mask and the image side-by-side.

The last three lines just state that the program will wait until the user presses the “esc” key (which has an id of 27) before it quits and destroys every OpenCV window.

If you’ve followed up to this point, you should end up with a mask that only has filled in white pixels for where the red circle was.

final-result

And there you have it! You just did color matching in OpenCV. We found an upper and lower bound for the shade of red that we were looking for, and created a mask that only had white pixels filled in for wherever there was a red that matched.

The next tutorial in this OpenCV series is Canny Edge Detection in Python with OpenCV.

Taking a Quack at Duck Typing

Your friend, Ruby, goes out and buys Java a pet duck. But wait, on closer inspection, it’s not a duck at all! It just walks like a duck.

Quack!

And quacks like a duck.

“What’s the matter?” Ruby asks.

“It’s not a duck!” Java complains, distraught that the pet has no inheritance relations with the Duck class.

“If it walks like a duck, and quacks like a duck, it’s a duck!”

So what is duck typing?


Duck typing is a feature that allows a language to call a method on an object, if it has the method. Ruby doesn’t care what the object is, but rather, what methods the object has.

However, a caveat of duck typing is that the it tends to only be built-in to the language if the language handles type checking during runtime. This means that duck typing will only work on dynamically typed languages, such as Ruby. In languages like Java and C++, type checking is done during compile-time. As a result, if there is a type conflict, the program will not even compile. Languages that do type-checking during compile-time are called statically typed languages.

In Java, declaring an integer will look like this :

int x = 0;

The type (int) is explicitly stated, which means that Java checks for types during compile-time, making it a statically typed languages.

In Ruby, it would look like this :

x = 0

Ruby sees that x was assigned a number at runtime. Since x was assigned a number, Ruby automatically knows that x must be a Fixnum.

How does it work?


First, we need two different objects that have the same method name. However, the method can’t be given to the object via the same superclass, because it would instead be inheritance.

Let’s take a look at a simple example of duck typing.

class Duck
  def quack
    puts "Quack!"
  end
end

class Alien
  def quack
    puts "I'm not a duck, but... Quack!"
  end
end

def try_quack(duck)
  duck.quack
end

try_quack(Duck.new)
try_quack(Alien.new)

Output :

Quack!
I'm not a duck, but... Quack!

How did Ruby know?


In Ruby’s mind, the Alien instance and the Duck instance are essentially the same. When we called the try_quack method, Ruby wanted an object that had a quack method.

In this case, when we passed in the Duck instance, Ruby saw that the Duck object would quack, so it called the Duck instance’s quack method.

For the Alien, even though the Alien class has nothing to do with the Duck class, it still has a quack method. As a result, Ruby happily calls the Alien class’s quack method.

Conclusion


Duck typing is a powerful feature of Ruby that allows you to call methods on seemingly different objects, as long as those objects have the same method names. As a result, there is no need for inheritance. You simply call the method, and if the object has it, it will work.

Ruby doesn’t care who the object is, but rather what it is.