NOTE: Are you interested in machine learning? You can get a copy of my TensorFlow machine learning book on Amazon by clicking HERE
Image processing may seem like a daunting and scary task, but it’s actually not as terrible as some people make it out to be. In this tutorial, we will be doing basic color detection in OpenCV version 2.4.13. with Python 3.5. Note that you will also need to install NumPy to run the code in this article.
How Does Color Work on a Computer?
On a computer, color can be represented in many formats. However, in this tutorial, we will be strictly concerned with only BGR (Blue, Green, Red) and HSV (Hue Saturation Value).
With BGR, a pixel is represented by 3 parameters, blue, green, and red. Each parameter usually has a value from 0 – 255. For example, a pure blue pixel on your computer screen would have a B value of 255, a G value of 0, and a R value of 0. Your computer would read this and say, “Ah. This pixel is 255 parts blue, 0 parts green, and 0 parts red.”
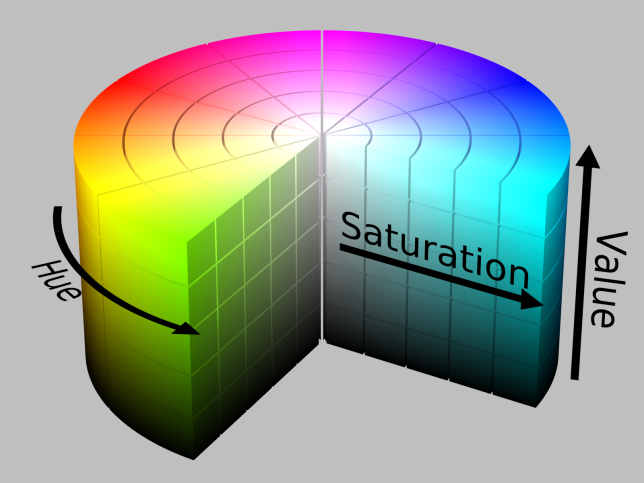
With HSV, a pixel is also represented by 3 parameters, but it is instead Hue, Saturation and Value.
Unlike BGR, HSV does not use the primary color to represent a pixel. Instead, it uses hue, which is the color or shade of the pixel.
The saturation is the intensity of the color. A saturation of 0 is white, and a saturation of 255 is maximum intensity. Another way to think about it is to imagine saturation as the colorfulness of a certain pixel. Value is the simplest of the three, as it is just how bright or dark the color is.
HSV can be imagined like a three dimensional cylinder, as seen in the picture below.
Converting BGR to HSV
Since we will be using HSV, you will need an BGR to HSV to converter because OpenCV uses a different HSV scale from popular image editors like Gimp.
First, copy the following code into your favorite text editor and save it as converter.py. The lower and upper bound part will be explained later.
import sys
import numpy as np
import cv2

blue = sys.argv[1]
green = sys.argv[2]
red = sys.argv[3]

color = np.uint8([[[blue, green, red]]])
hsv_color = cv2.cvtColor(color, cv2.COLOR_BGR2HSV)

hue = hsv_color[0][0][0]

print("Lower bound is :"),
print("[" + str(hue-10) + ", 100, 100]\n")

print("Upper bound is :"),
print("[" + str(hue + 10) + ", 255, 255]")
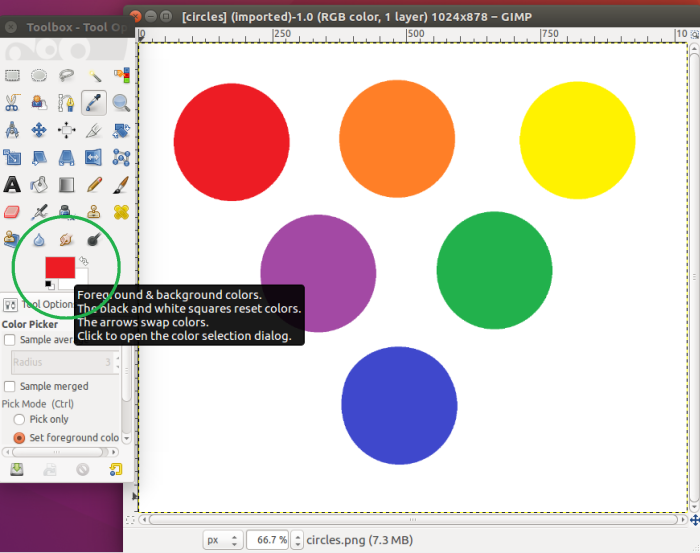
Now, we need an image to do color detection on. Download the image below and place it in the same directory as converter.py

We have an image, and an BGR to HSV converter. That’s all we need to get started, so let’s jump into the actual image processing.
Let’s Get to the Code Already!
Fire up your favorite text editor and save a new file called “image.py” in the same directory as the circles.png file.
First, we need to grab our imports and load the image in OpenCV.
import cv2
import numpy as np

img = cv2.imread('circles.png', 1)
The 1 means we want the image in BGR, and not in grayscale.
As stated before, we will be using HSV instead of BGR, so we need to convert our BGR image to a HSV image with the following line.
hsv = cv2.cvtColor(img, cv2.COLOR_BGR2HSV)
Great! Now that the picture is in HSV, we need something called a “lower range” and an “upper range” for the hue that we are searching for. The lower range is the minimum shade of red that will be detected, and the upper range is the maximum shade of red that will be detected. In our case, let’s search for the red circle at the top left. To do so, we will need to obtain the RGB numbers for the red circle.
I personally prefer Gimp, so I will be using that for the color picker feature. Simply use the color picker and click on the red circle, and you will have copied it. Now, click on the red shade that you copied. (see photo below)
After clicking on that, you should see the following screen :
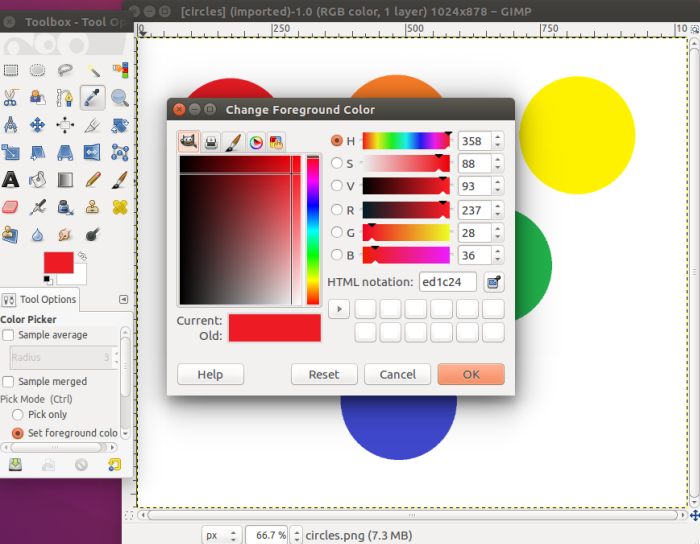
We can see that red equals 237, green equals 28, and blue equals 36. We will be using these numbers with the converter to automatically generate the respective lower range and upper range HSV values for OpenCV. (Note that this method is inaccurate when the color is less pure or murky)
Remember that the HSV values shown in the photo are different from the ones in OpenCV. The scaling is different, so you can not use the values Gimp gives you for OpenCV.
Open up your terminal or command line and cd into the directory with the converter.py file and run the following :
python3 converter.py 36 28 237
Note that the order is in BGR, not RGB. After you run the script, it should output that the lower range = [169, 100, 100] and the upper range = [189, 255, 255].
We will now use NumPy to create arrays to hold our lower and upper range.
lower_range = np.array([169, 100, 100], dtype=np.uint8)
upper_range = np.array([189, 255, 255], dtype=np.uint8)
The “dtype = np.uint8” simply means that it will have the data type an 8 bit integer, which makes sense, because the max possible value for the hue, saturation, and value is 2^8 – 1.
Finally, with the lower range and the upper range found, we can create a mask for our image.
mask = cv2.inRange(hsv, lower_range, upper_range)

cv2.imshow('mask',mask)
cv2.imshow('image', img)

while(1):
  k = cv2.waitKey(0)
  if(k == 27):
    break

cv2.destroyAllWindows()
A mask is simply a specific part of the image. In this case, we are checking through the hsv image, and checking for colors that are between the lower-range and upper-range. The areas that match will be set to the mask variable.
After that, we can display both the mask and the image side-by-side.
The last three lines just state that the program will wait until the user presses the “esc” key (which has an id of 27) before it quits and destroys every OpenCV window.
If you’ve followed up to this point, you should end up with a mask that only has filled in white pixels for where the red circle was.

And there you have it! You just did color matching in OpenCV. We found an upper and lower bound for the shade of red that we were looking for, and created a mask that only had white pixels filled in for wherever there was a red that matched.
The next tutorial in this OpenCV series is Canny Edge Detection in Python with OpenCV.

Hi, nice tutorial. There’s an issue with the typography of blog.
On this line “hsv = cv2.cvtColor(img, cv2.COLOR_BGR2HSV)”
Underscore between COLOR & BGR2HSV is not visible.
LikeLike
Hi, thanks for catching that!
It seems to display properly on Google Chrome, but on Firefox, it’s difficult to see.
LikeLiked by 1 person
it was an awesome article, thanks a lot 🙂
LikeLike
[…] my previous tutorial, Color Detection in Python with OpenCV, I discussed how you could filter out parts of an image by […]
LikeLike
Do you know how to receive all the pixels with the red color ?
Like in an array
Thanks in advance 😉
LikeLike
Hello,Thank you so much for this article. How exactly do we adapt this to detect yellows /greens?
LikeLike
i only have black screen after running the script.What would be the reason?
LikeLike
[…] (2016). Color Detection in Python with OpenCV. [online] Available at: https://henrydangprg.com/2016/06/26/color-detection-in-python-with-opencv/ [Accessed 28 Oct. […]
LikeLike
[…] Color Detection in Python with OpenCV […]
LikeLike
[…] 使用OpenCV在Python中进行颜色检测 […]
LikeLike